How to Make a Checkerboard Cake
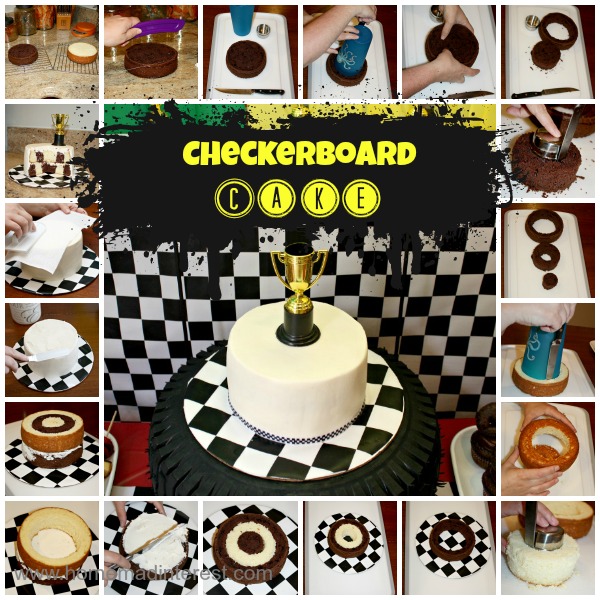
Last weekend was Melinda’s son, Sawyer’s birthday. Another 4-year-old in my life…I need these kids to stop growing up! Sawyer requested a race car theme so Melinda and I have been working on all of the decorations for months. The decorations included lots of checkered flags, banners, tablecloths…you name it and we probably found it in a checkerboard pattern so, we decided to try making a checkerboard cake.
Have you ever had a checkerboard cake? I had only seen them online and I always thought they seemed a little intimidating so I had never tried to make one. Turns out they are pretty simple!
First you bake your cake. We make a two layer 6″ cake but you’d follow the same steps whatever the size of your cake might be. The important part is you must have two different colors of cake. We used devil’s food cake for one layer and white cake for the other layer. Since we were only making a two layer cake and each box of cake mix made 2 layers that left us with some extra cake. We used the extra to make cake balls but, you could also make a 4 layer cake, or wrap the layers up and put them in the freezer for another day.
So, once your cake is baked and cooled you’ll want to level it so that it stacks nicely. I used a Wilton cake leveler but if you don’t have one you can just use a long sharp knife. Slice off the rounded top of the cake and now you have a nice flat surface to work with.
Now it is time to create your checkerboard pattern. This is done by cutting each layer into rings and taking the rings apart. Once they are apart you but the layers back together alternating the colors. You’ll need to look around the kitchen for some round objects that you can use to cut out your cake rings. If you can’t find anything the right side you could cut out some circles from a piece of cardboard.
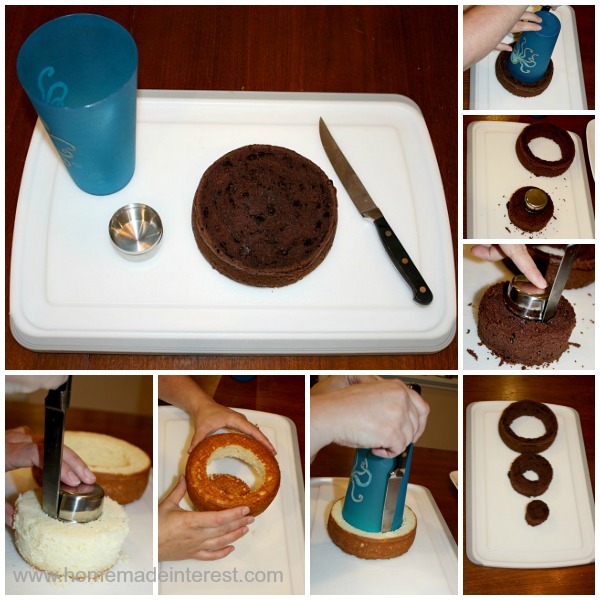
Place whatever you are tracing around on your cake and use a sharp knife to cut around it, make sure to go all the way through the cake. Once you have cut your circle flip it over and slide the outside ring off. Then repeat the process with your smaller circle. When you are done you should have two layers of cake cut into rings and one centerpiece of each flavor.
Now you put the cakes back together, alternating colors. So, if you start with a white outer right you’ll put the middle-sized chocolate right inside of it and end with a white centerpiece.
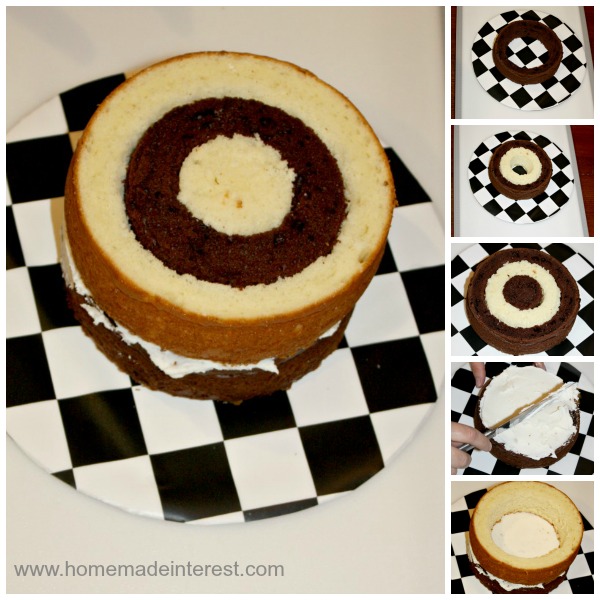
When you get your first layer put together spread frosting over the top and then build your second layer.
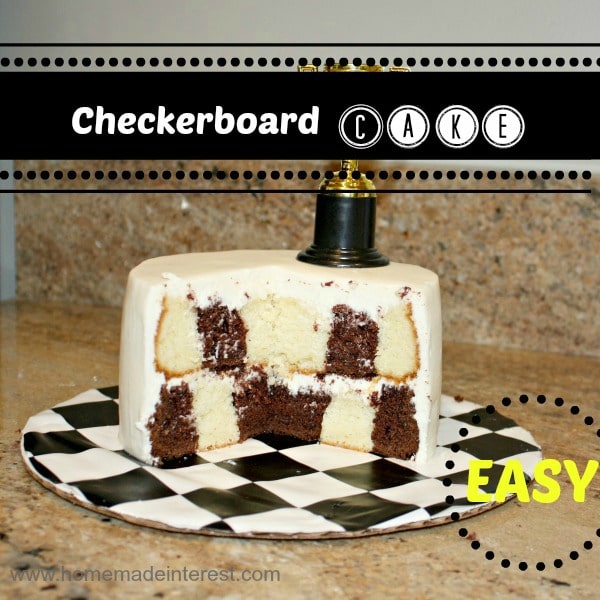
Once everything is together you just treat it like a regular cake. Melinda wanted to keep the cake really simple so she asked me to do a smooth white frosting. Neither of us like fondant so I use the Viva paper towel frosting method that lets you smooth out buttercream frosting so it looks like fondant…but actually tastes good! I’m not going to say this is the easiest frosting technique out there. It isn’t complicated but it does take time and patience, at least when I do it :).
You will need to use a crusting buttercream frosting recipe. These recipes use shortening and the frosting firms up after sitting for a while. The crusting effect keeps the frosting from sticking to the paper towel. This is the recipe I use:
Crusting Buttercream Frosting

Ingredients
- 1 stick Butter
- 1 1/2 c Shortening
- 1 lb Confectioner sugar
- 1/3 c Water
Instructions
- Mix the butter, shortening and confectioner sugar.
- Add 1/3c water a tablespoon at a time until the consistency is where you like it.
Nutrition
To frost the cake you will need some really hot water (I use water from my Keurig), an angled spatula, and Viva paper towels (in this case the brand is important Viva paper towels do not have quilting so they are perfectly smooth). I also use a Wilton icing smoother but you can just use your hands if you don’t have one.
This tutorial on Cake Central explains the frosting method better than I ever could. It is my favorite and I refer back to it when I use this frosting technique.
In the end you have a perfectly smooth frosting that everyone will think is fondant!
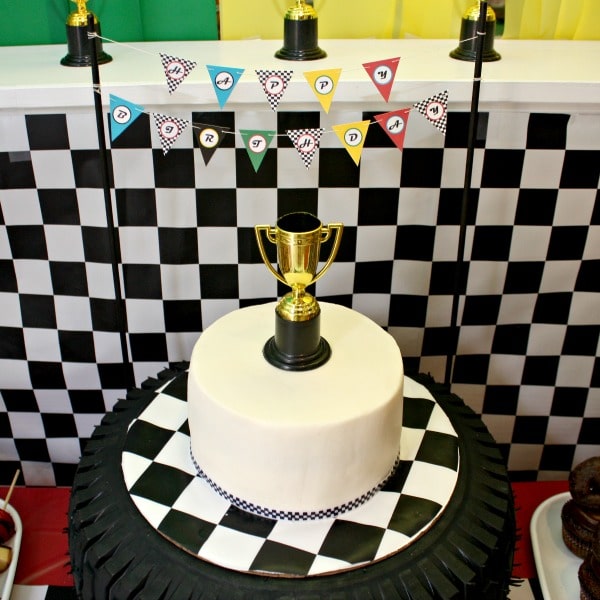
The cake was perfect and delicious, everyone loved it. Check back on Saturday for our post on the Race Car party and all the fun details that went into it!
![]()


thanks for sharing pinned and definitely will be making cake looks like fun and so yummy have a great day.
Thanks Lorraine!
So cool! Pinned. Thank you for being part of our party. We appreciate you stopping by. I hope to see you on Monday at 7 pm. http://loulougirls.blogspot.com/
Happy Friday! Lou Lou Girls
I love making fun cakes. This is so great! Thanks for linking up to The Creative Exchange!
Thanks for hosting the party! 🙂
The cake looks really nice,love the easy step by step photos.
Thanks for sharing!!
I love this! Thanks for sharing the recipe for my round up which will go live October 17th!
~Meaghan from DIYfaerie