Making Homemade Chouriço: A Traditional Portuguese Sausage


We’re going to show you how to make Chouriço, a Portuguese smoked sausage, in the traditional Portuguese style from stuffing the sausage, through the smoking and drying process.
This is every Portuguese-American’s favorite time of year. It’s matança time! Soon, we will all be enjoying Chouriço, a smoked Portuguese sausage that is a staple in Portuguese cuisine. I am first generation Portuguese-American, and to keep our culture alive, my parents have continued certain traditions here in America.
My favorite is making homemade Chouriço the old-fashioned way. Years ago, we would have a matança (the slaughtering of a pig) in the colder months, but as my parents got older, they switched to buying the pork from a butcher. They still spend days making a huge batch of sausage and smoking it in their own backyard smoker, and it’s always a big event!
Note: This post may contain affiliate links. That means if you click on a link and make a purchase we may receive a small commission. Thank you!
Table of contents

What Is Chouriço?
Chouriço, a traditional Portuguese sausage, reigns as a beloved culinary staple in Portugal and its island regions of Madeira and Azores. The popularity of this delectable pork sausage has also spread to countries with Portuguese influences, such as Brazil.
Unlike common sausages, Chouriço flaunts a distinct smoky flavor spiked with garlic and paprika, offering an unmistakable taste experience.
This flavorful Portuguese delight is derived from the finely shredded Boston butt or pork shoulder. Quality variants avoid fillers for authenticity in favor of leaner meat content.
As for preparation methods, an array of options exists; chouriço can be smoked to perfection and then served cold or cooked using various methods including frying, grilling, or boiling.
This versatility bolsters its significance across Portuguese cuisine staples like calde verde, a traditional soup that highlights the rich flavors inherent in chouriço.
Difference Between Portuguese, Spanish, and Mexican Chourico/Chorizo
Portuguese chouriço, Spanish chorizo, and Mexican chorizo, while sharing similarities, exhibit distinct differences in flavor, texture, and culinary uses.
- Portuguese chouriço is known for its smoky and spicy flavor, often used in stews and rice dishes, and can be either smoked or cured.
- Spanish chorizo, on the other hand, is characterized by its deep, smoky flavor from smoked paprika and is typically cured or semi-cured, making it suitable for eating as is or cooking.
- In contrast, Mexican chorizo is usually fresh and requires cooking, offering a crumbly texture and a spicy, tangy flavor due to the use of chili peppers and vinegar, making it a popular ingredient in tacos, breakfast dishes, and salsas.
How to Pronounce Chouriço
Mastering the pronunciation of chouriço merely requires familiarity and practice. The correct Portuguese articulation sounds like “sho-ree-so”. It’s a swift, fluid word without hard pauses between syllables.
Try not to linger on any single part of it too long; let your mouth glide easily from one sound to the next.
One common pitfall among non-native speakers is saying chouriço as “chore-ee-so” or “chor-ee-tho.” This leads to confusion and could even have you ending up with a dish you did not desire at all! So, make sure you’re saying it right: “sho-ree-so.”
It’s also important to note that regional accents in Portugal can slightly influence pronunciation. Even in other Portuguese-speaking countries like Brazil or Angola, there might be slight differences in how they pronounce chouriço.
Ingredients You’ll Need
Making your own chouriço is very labor-intensive and time-consuming so typically you only do it once per year. Therefore this recipe makes a huge batch of sausage so we have it to use all year long, and we can share it with friends and family.
You can scale down the recipe as needed but I’m going to share the full recipe just the way we make it.
- Pork butt – you can substitute with pork shoulder if needed.
- Garlic cloves – Use fresh garlic cloves and cut each one in half. You’ll remove these from the meat before you begin adding it to the casings.
- Salt – I recommend kosher salt for this since it sticks to the meat the best.
- White wine – Any inexpensive white wine will do
- Paprika – We always use McCormick paprika
- Black pepper
- Cayenne pepper – this is what gives the chourico it’s signature spicy flavor.
- Bay leaves – Use whole bay leaves and try to keep them whole while the meat marinates. You’ll remove these before adding the meat to the casings.
- Casings – Sausage or hot dog casings are required to create the chourico. You can order them online or speaker to your local butcher to find the right ones for you.
Instructions for Making Homemade Chouriço
These are step-by-step instructions for making homemade chouriço in a traditional outdoor smoker. You’ll have to adjust the instructions to match whatever kind of smoker you are using.
Making the sausage
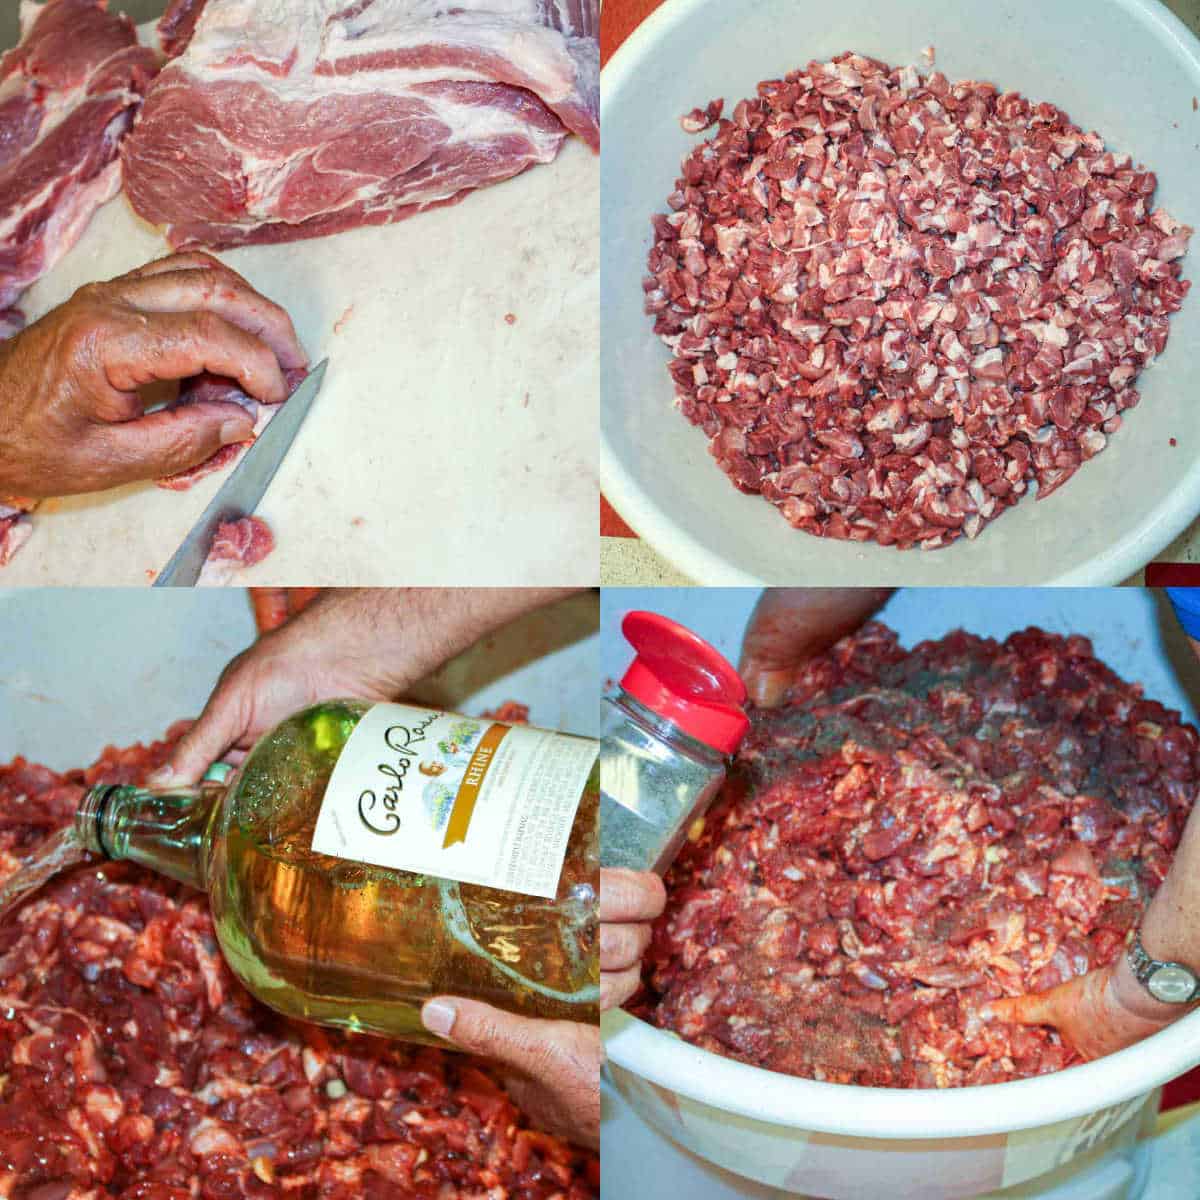
Step 1 – Prep the pork. Start by trimming most of the fat off the pork. You want about 80% meat and 20% fat. Also remove any sinew or gristle from the meat.
Cut the pork into 1-inch diameter cubes.
Step 2 – Season the meat. Place all the cubed pork, garlic cloves, salt, wine, paprika, black pepper, cayenne pepper, and bay leaves in a large basin. Mix everything together making sure all the seasoning is evenly throughout the pork. Try not to break down the bay leaves because they will have to be removed before filling casings.
Step 3- Marinate. Cover the basin with plastic wrap to seal and place the meat in the refrigerator. Every 12 hours remove the meat from the refrigerator and mix well. You’ll do this for 2 days.
Step 4 – Taste test. To test your seasoning level at every mixing, cook a handful of pork in a skillet and taste it. If more seasoning is needed you can add it to the uncooked meat mixture. Remember when smoking, the pork will lose a lot of flavor. I highly recommend over seasoning.

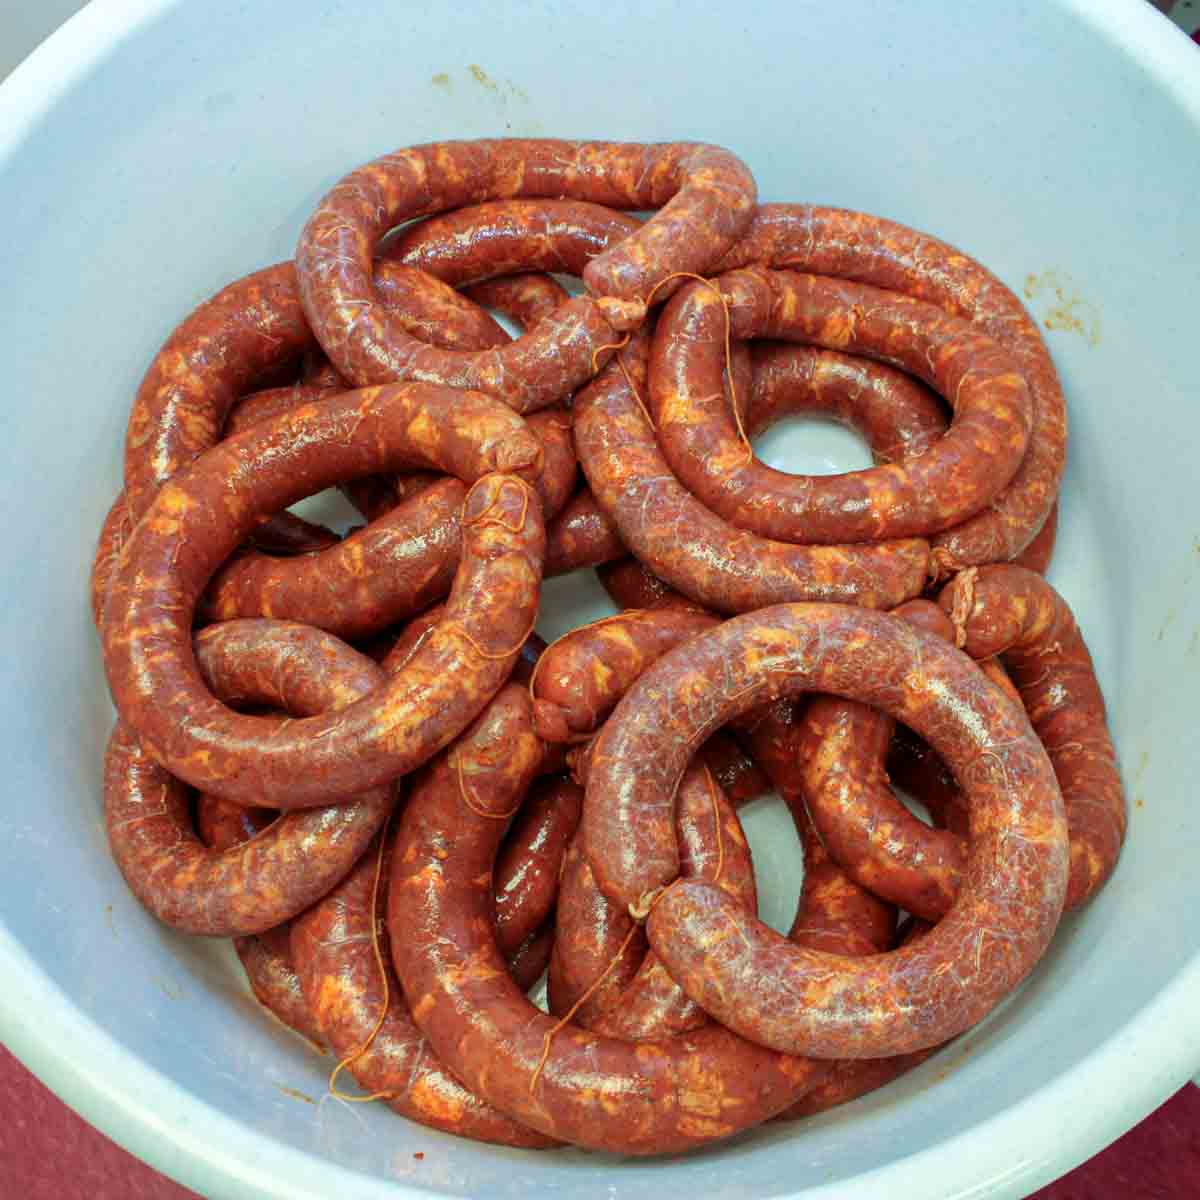
Step 5 – Prepare Casings. After the meat has marinated for 2 days it is time to fill the casings. Prepare the casings by rinsing each of them a few times. Check for holes or defects. Using baking twine, tie off one end of each casing.
Step 6 – Prepare meat mixture. Prepare the meat mixture by removing all the garlic cloves and bay leaves.
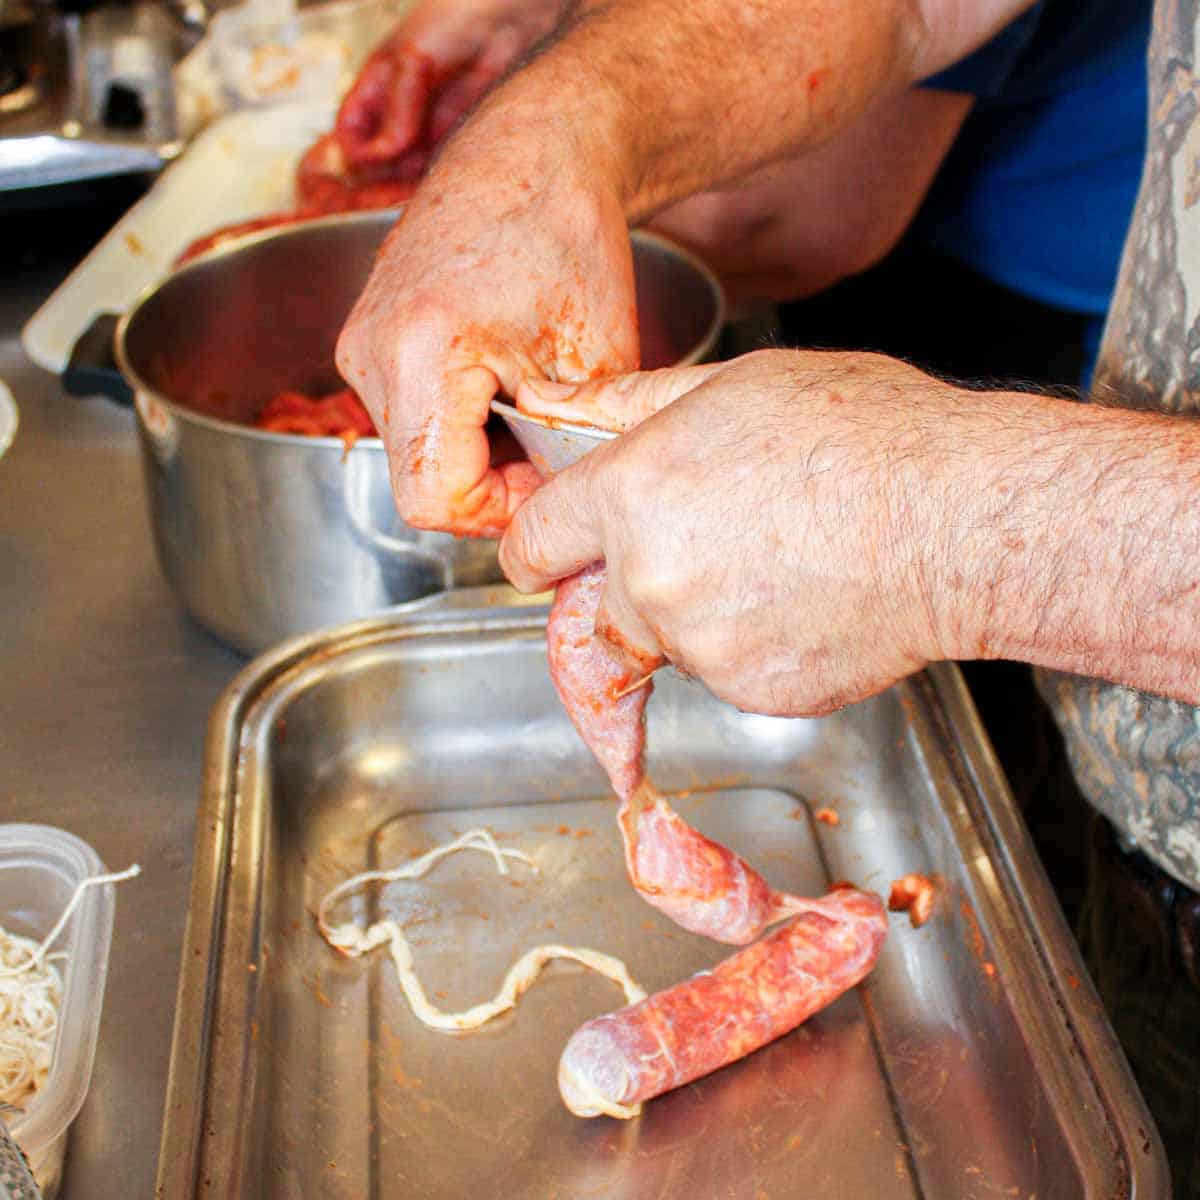
Step 7 – Fill casings. Place a 1-1.5 inch funnel into the open end of each of the sausage casings. While holding the casing on the end of the funnel begin to fill the casing with the pork mixture. Slowly work the meat to the end of the casing so it is tightly filled.
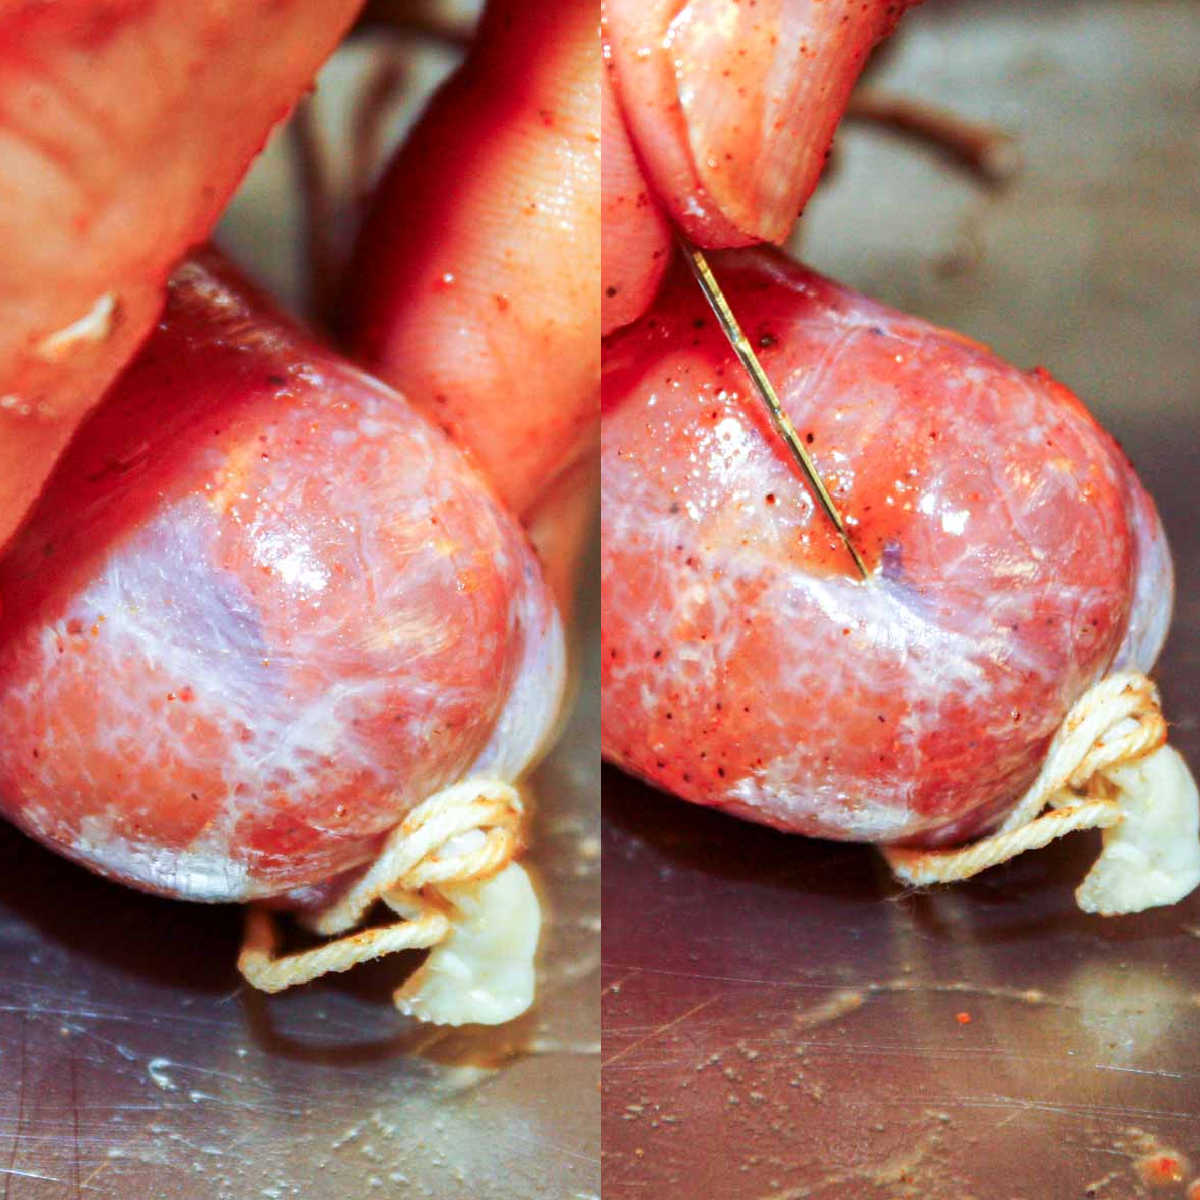
Step 8 – Remove excess air. You don’t want any excess air in the sausage casing. To remove it use a safety pin or needle to gently pop any air pockets. Continue to press the sauasge mixture down into the casing to fill up the space. Pro Tip: tie a long colorful string to the needle so it doesn’t get lost in the process.

Step 9 – Close casings. When each casing is filled use butcher’s twine to tightly tie off the open end of the casing.
This is a family affair, the more the merrier! It takes all day to fill the casings, so invite all your tia’s and tio’s (aunts and uncles) over.
Smoking the Sausage
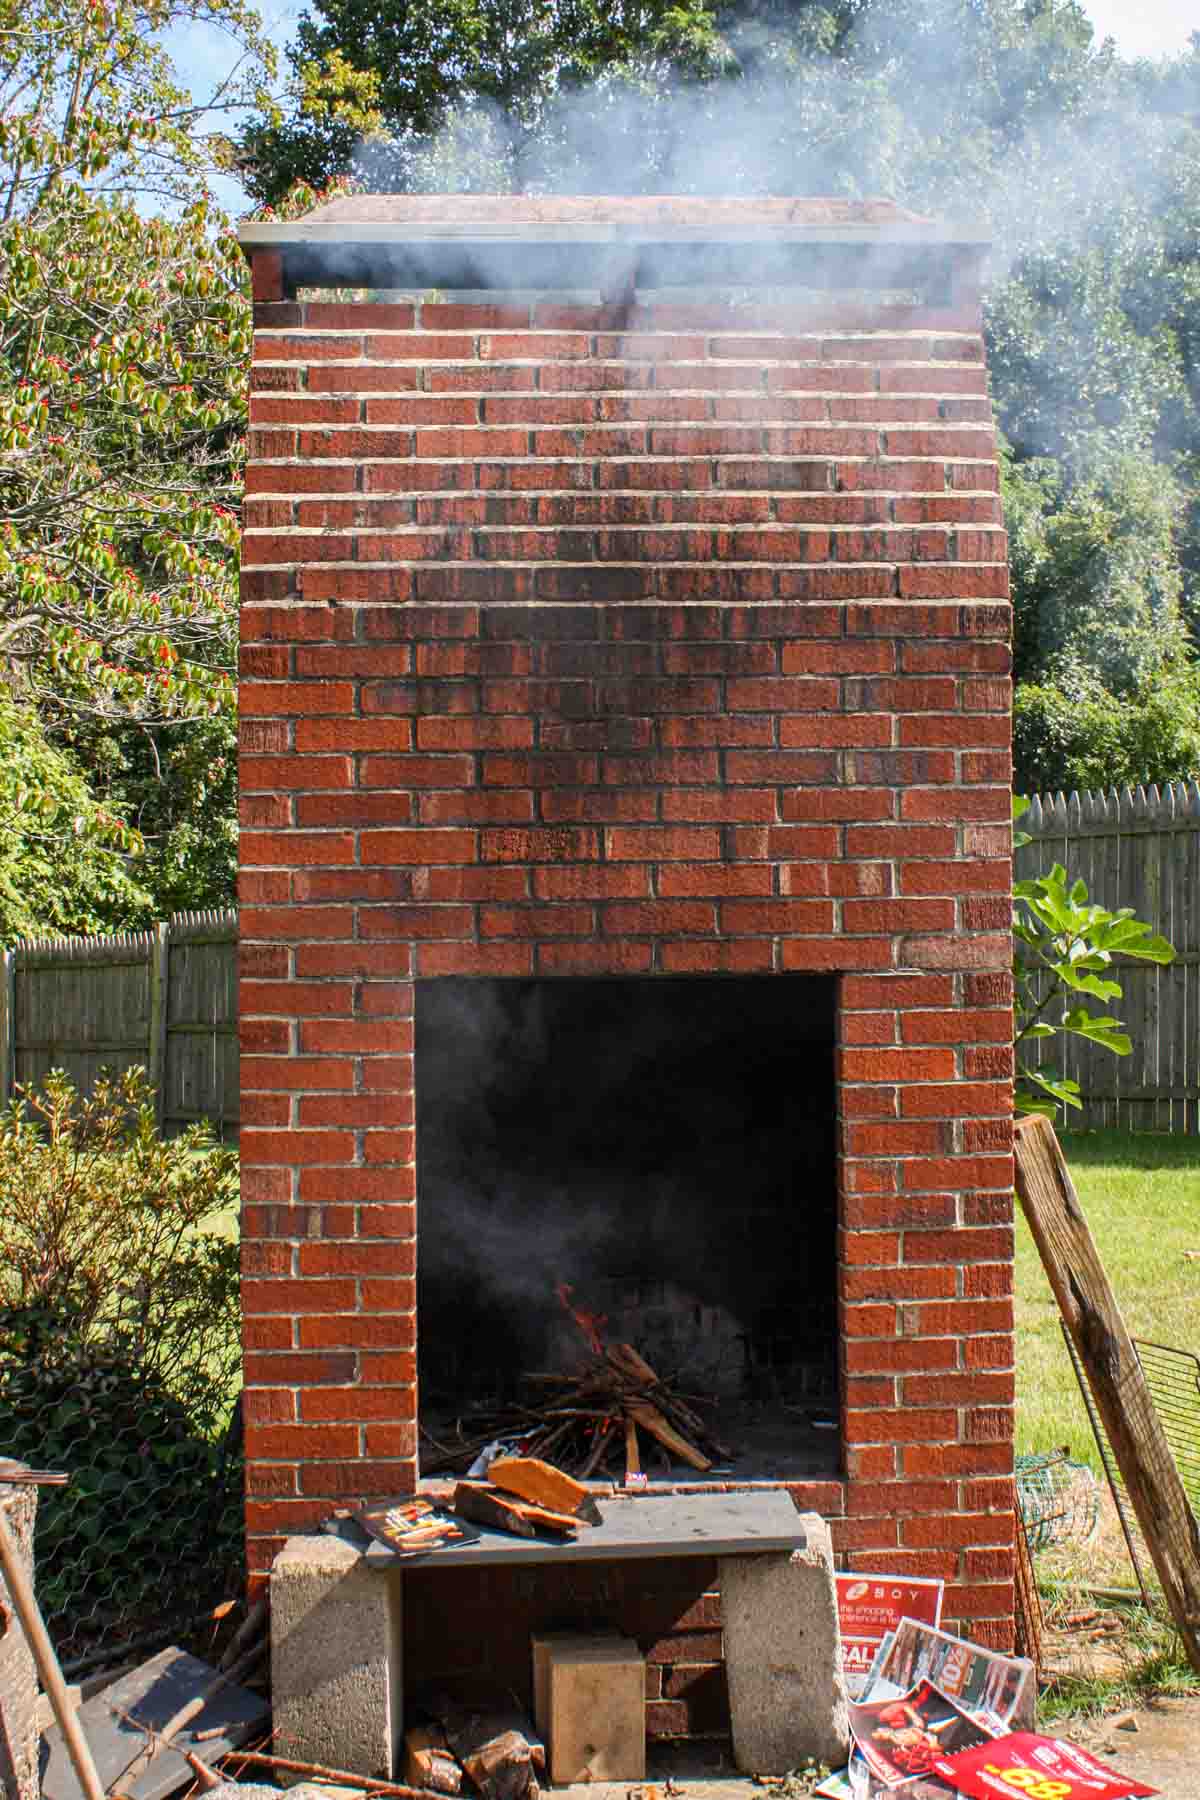
Once all of the sausages are made it’s time to smoke them. Every Portuguese family I know has one of these big brick ovens in their backyard. If you know someone who is Portuguese and you’ve always wondered what it was now you know, it’s to smoke sausages! Please note these instructions are for the large, brick smoker that we use. You’ll have to adjust the instructions to match whatever kind of smoker you are using.
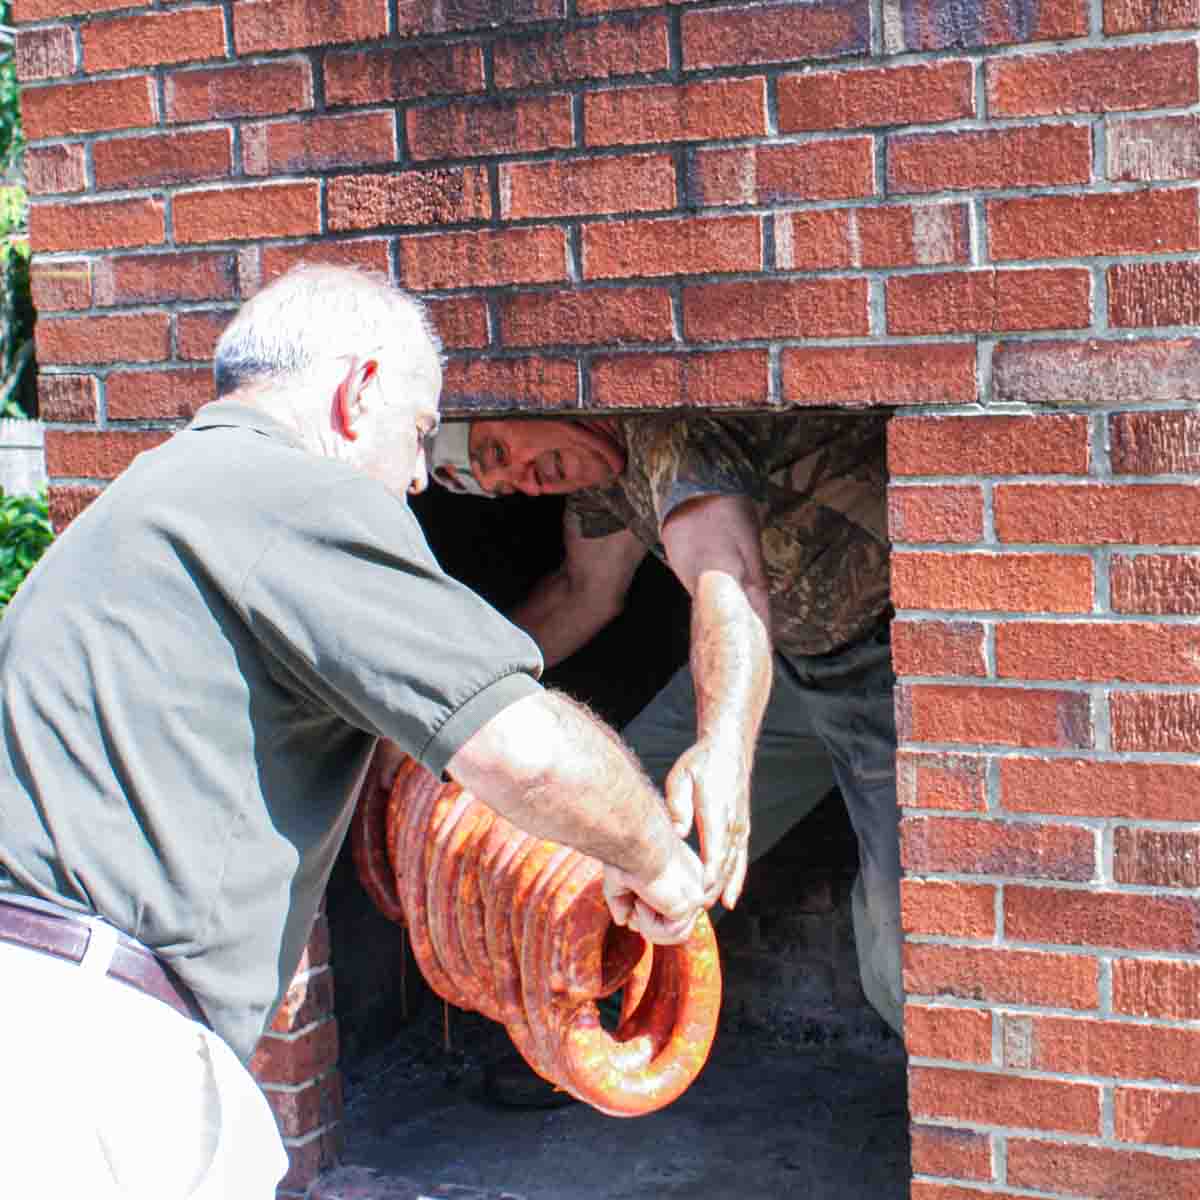
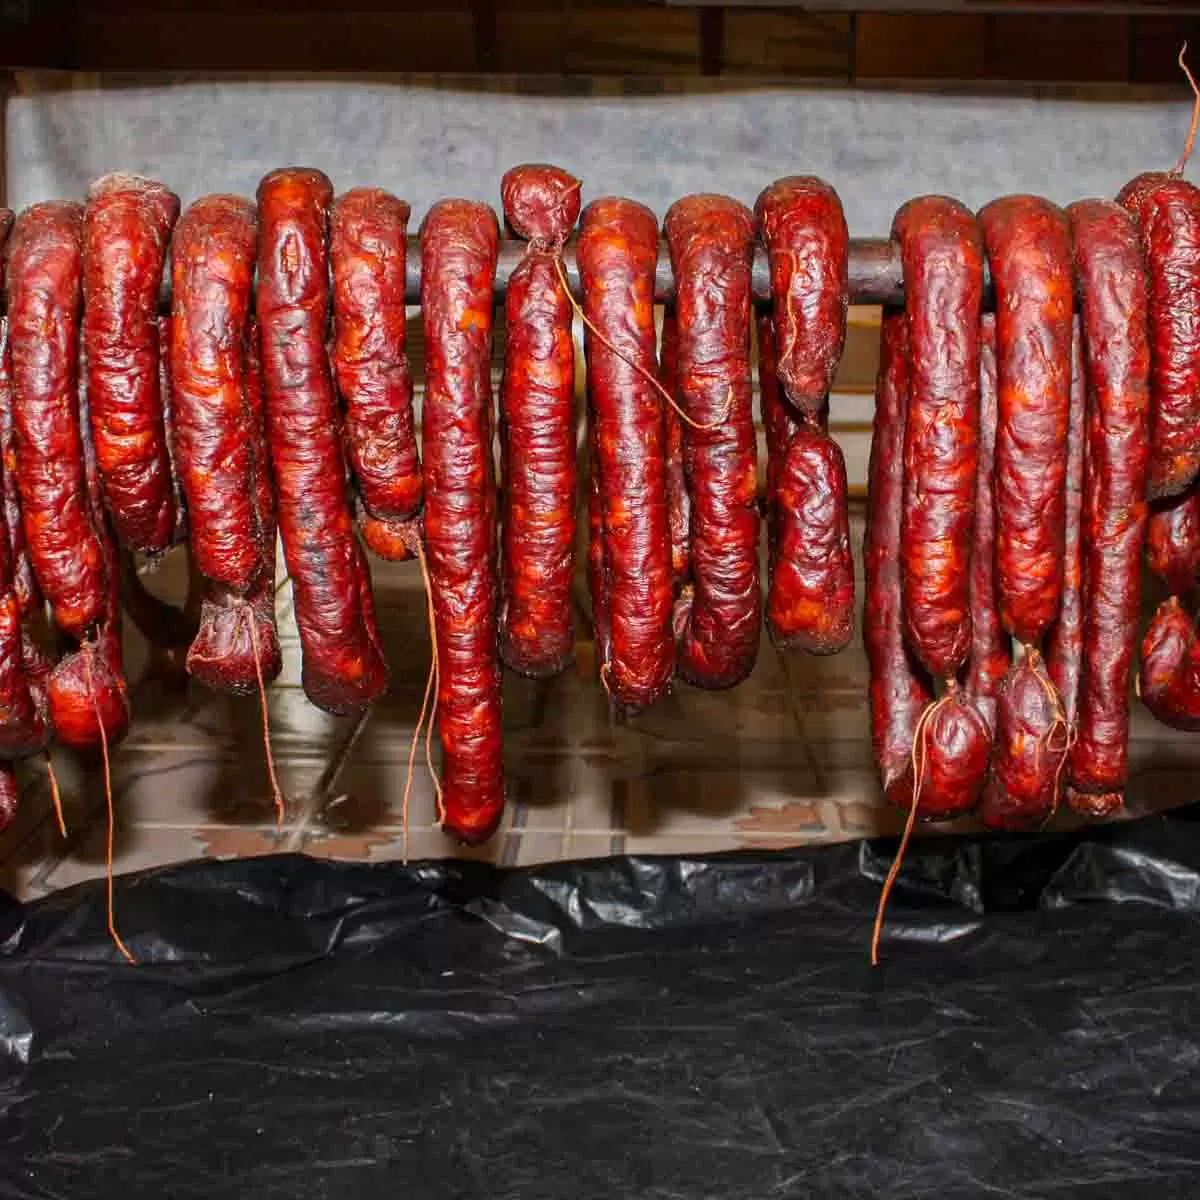
Step 1 – Place in smoker. The chourico is gently hung on a wooden pole (we use an old broom stick). They can be pretty close together but they shouldn’t be touching. The pole is e hung close to the top of the smoker so the sausage won’t burn or get smoked too fast.
Step 2 – Start smoking. Build your fire and begin smoking the sausages. Be careful that the flames do not reach the sausage. Remember, low heat and lots of smoke for a long period of time. Keep an eye on the fire for flare ups and make sure the fire does not go out.
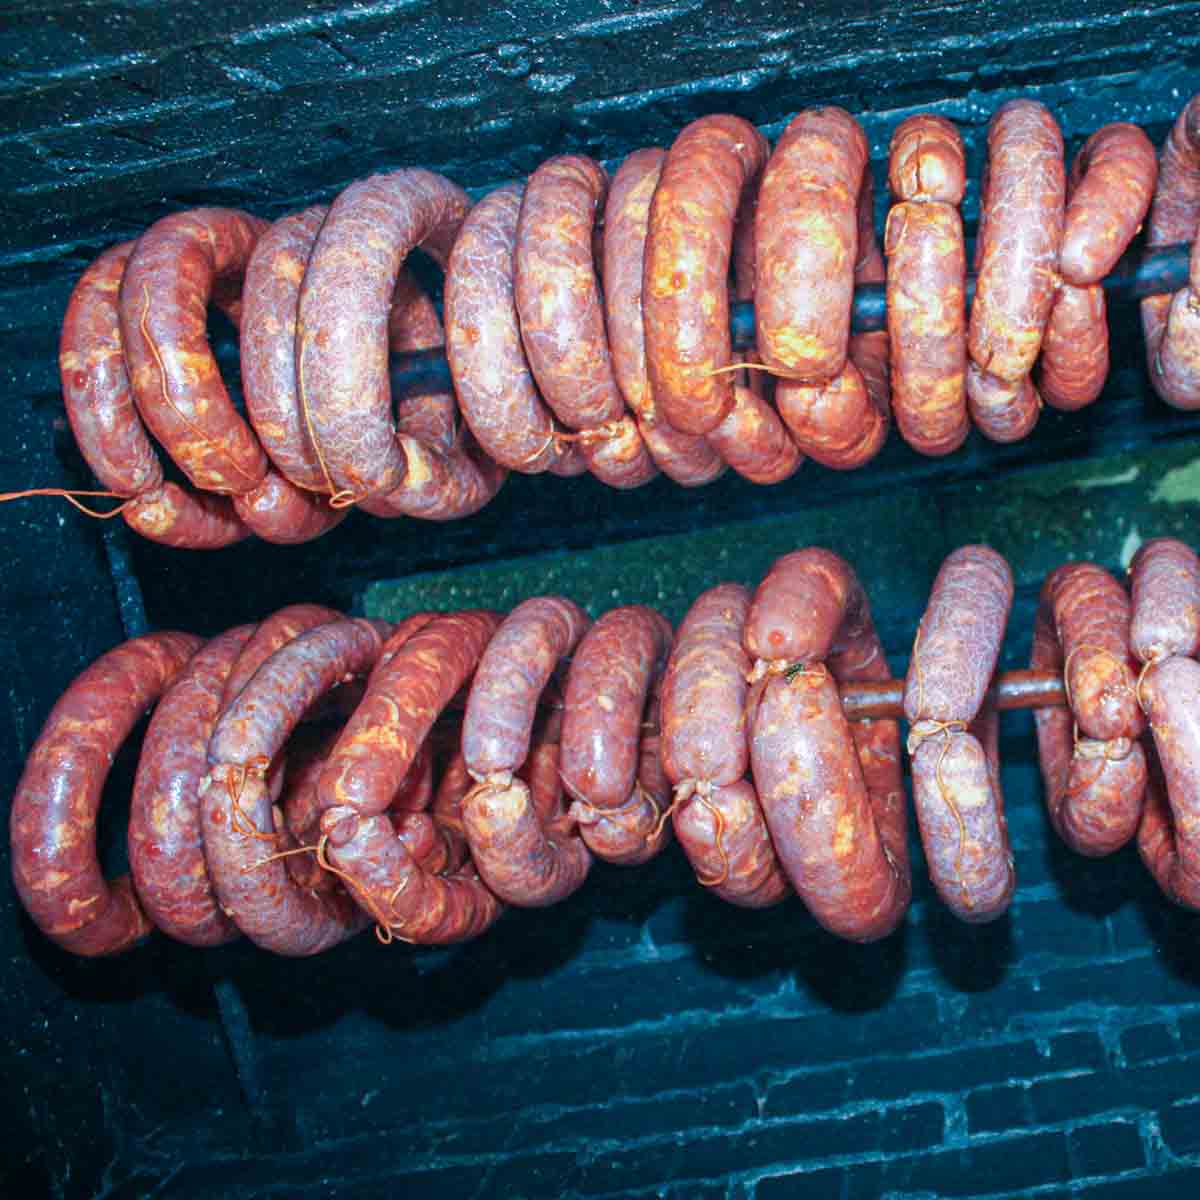
Step 3 – Continue smoking. After 24 hours, let the fire go out, flip the sausages. Then start the smoking process over again. At this point when you flip them, you will need to determine if you are halfway done or if it will take longer than an additional 24 hours. This is tricky, and where experience comes into to play. Smoking for 24 hours on each side is usually the minimum. An additional day or two may be needed.
Drying the Sausage
When your sausages have finished smoking, bring them indoors and hang them to dry for 2-3 days. Once it has dried you can eat it immediately or store for later use
If you ever get the chance to try homemade Portuguese chourico, don’t pass it up! I may be a little biased but I think it is by far the best sausage you will ever try!

How to Use Chouriço
Chouriço’s versatility in the kitchen means that the possibilities are nearly endless! I love to add it to a charcuterie board along with some hard and soft cheeses or to fry it up and add it to an omelet for a delicious breakfast.
Here are a few simple ways to enjoy fresh chouriço. Feel free to experiment and find your favorite way to enjoy this delicious sausage.
- Grilled or Pan-Fried: Slice the chouriço and grill or pan-fry the slices until crispy. Serve them as an appetizer or incorporate them into sandwiches, salads, or wraps for added flavor and texture.
- Pasta Dishes: Sauté chouriço slices or chunks and toss them with your favorite pasta, sauce, and vegetables. The spiciness of the chouriço complements creamy or tomato-based sauces well.
- Pizza Topping: Use thinly sliced chouriço as a pizza topping. It pairs wonderfully with cheese, tomatoes, olives, and various other toppings to create a flavorful and hearty pizza.
- Soups and Stews: Incorporate chouriço into soups and stews to add depth and richness to the broth. It pairs well with beans, lentils, vegetables, and potatoes.
- Omelettes and Scrambles: Add diced chouriço to omelettes or scrambled eggs, along with cheese, herbs, and vegetables for a satisfying breakfast or brunch.
Traditional Portuguese Recipes That Use Chouriço
- Caldo Verde Soup – a traditional Portuguese soup made with kale, potatoes, and a little chouriço on top. It’s a classic comfort food that makes a delicious weeknight dinner.
- Cozido à Portuguesa – this is a hearty dish of meats and vegetables, slow cooked into delicious comfort food.
- Chouriço Assado – This is a flame-grilled Chouriço dish that is crisp, flavorful, and totally delicious!
- Cataplana de Marisco – a Portuguese fish stew simmered with smokey chourico.
- Pão com Chouriço – a Chourico Bread that is similar to a sausage roll you’d find in the UK.
How to Store It
Storing your homemade chouriço properly is crucial to maintain its flavor, texture, and longevity. Here’s a step-by-step guide on how to store chouriço:
- Cooling Down: After the smoking and drying process, allow the chouriço to cool down to room temperature. This step is essential to prevent condensation from forming inside the storage packaging.
- Wrapping: Individually wrap each chouriço sausage in parchment or butcher paper. This type of paper allows the chouriço to breathe while protecting it from external contaminants.
- Vacuum Sealing or Ziploc Bags: For longer shelf life, consider vacuum sealing each wrapped chouriço. If a vacuum sealer is not available, place the wrapped sausages in airtight Ziploc bags, removing as much air as possible before sealing.
- Refrigeration: Store the sealed chouriço in the refrigerator if you plan to consume it within a month. The ideal temperature for storage is between 34°F and 40°F (1°C and 4°C).
- Freezing: For extended storage, chouriço can be frozen. Place the sealed bags in the freezer, ensuring they are well-spaced to allow for efficient freezing. Label each bag with the date of freezing for future reference.
- Thawing: When you’re ready to enjoy your chouriço, remove it from the freezer and allow it to thaw slowly in the refrigerator. Avoid thawing at room temperature as this can encourage bacterial growth.
- Inspecting Before Use: Before cooking or consuming, inspect the chouriço for any signs of mold, off odors, or sliminess. If any of these signs are present, it is best to discard the affected sausage.
- Re-packaging: If you’re not using the entire chouriço, re-wrap the unused portion following the same steps and return it to the refrigerator or freezer promptly.
By following these steps, you can enjoy your homemade chouriço for an extended period, savoring its flavors and textures in a variety of dishes. Keep in mind that homemade products lack preservatives, so proper storage is key to maintaining quality.
More Authentic Portuguese Recipes
- Portuguese Rice Pudding {Arroz Doce}
- Portuguese Milk Tarts {Queijadas de Leite}
- Portuguese Chocolate Salami {Salame de Chocolate}
- Bolo de Bolacha {Portuguese Biscuit Cake}
- Portuguese Shrimp Turnovers – Rissóis de Camarão
- Portuguese-style Baked Rockfish
Like this recipe?
Make sure to follow us on Instagram and Pinterest for more recipes like this.
Portuguese Sausage- A Family Tradition

Ingredients
- 64 pounds Trimmed pork butt , cut into small cubes
- 2 cups Garlic cloves , each clove cut in half
- 1 1/2 cup Kosher salt
- 6 liters White wine, any inexpensive white wine will do
- 14 ounces Paprika, we use McCormick paprika
- 1 1/2 ounces Black pepper
- 1 ounce Ground cayenne pepper
- 10 Bay leaves
- 40-50 Sausage casings , depending on the size of the casings
Instructions
- Start by trimming most of the fat off the pork. You want about 80% meat and 20% fat. Also remove any sinew or gristle from the meat.
- Cut pork into 1-inch cubes.
- Place all the cubed pork, garlic cloves, salt, wine, paprika, black pepper, cayenne pepper, and bay leaves in a large bowl. Mix everything together making sure all the seasoning is evenly throughout the pork. Try not to break down the bay leaves because they will have to be removed before filling casings.
- Cover the bbowl with plastic wrap to seal and place the meat in the refrigerator. Every 12 hours remove the meat from the refrigerator and mix well. You'll do this for 2 days.
- Test your seasoning level at every mixing. Cook a handful of pork in a skillet and taste it. If more seasoning is needed you can add it to the uncooked meat mixture. Remember when smoking, the pork will lose a lot of flavor. I highly recommend over seasoning.
- After the meat has marinated for 2 days it is time to fill the casings. Prepare the casings by rinsing each of them a few times. Check for holes or defects. Using baking twine, tie off one end of each casing.
- Prepare the meat mxiture by removing all the garlic cloves and bay leaves.
- Place a 1-1.5 inch funnel into the open end of each of the sausage casings. While holding the casing on the end of the funnel begin to fill the casing with the pork mixture. Slowly work the meat to the end of the casing so it is tightly filled.
- You don't want any excess air in the sausage casing. To remove it use a safety pin or needle to gently pop any air pockets. Continue to press the sauasge mixture down into the casing to fill up the space. Pro Tip: tie a long colorful string to the needle so it doesn't get lost in the process.
- When each casing is filled use butcher's twine to tightly tie off the open end of the casing.
- Once all of the sausages are made it's time to smoke them. Please note these instructions are for the large, brick smoker that we use. You'll have to adjust the instructions to match whatever kind of smoker you are using.
- Place the filled sausages onto a stick that is will suspend them over the fire. Make sure that the sausages are spaced apart so that they are not touching.
- Build your fire and begin smoking the sausages. Be careful that the flames do not reach the sausage. Remember, low heat and lots of smoke for a long period of time. Keep an eye on the fire for flare ups and make sure the fire does not go out.
- After 24 hours, let the fire go out, flip the sausages. Then start the smoking process over again. At this point when you flip them, you will need to determine if you are halfway done or if it will take longer than an additional 24 hours. This is tricky, and where experience comes into to play. Smoking for 24 hours on each side is usually the minimum. An additional day or two may be needed.
- When your sausage has finished smoking, bring them indoors and hang them to dry for place them indoors and let them dry.2-3 days.
- Once it has dried you can eat it immediately or store for later use.
What!? This looks amazing. We love sausage, and the spicier the better! I have never in my life tried to make my own. So cool!
It is some of the best sausage I have ever had. I love getting some for my freezer:)
My entire family has it shipped to us from the East coast to Michigan. ABSOLUTELY LOVE IT. Would love to learn to make it ourselves.
I’d love to know where to purchase it on the east coast as the only one my family ever purchased ours was in San leandro on the west coast, but they went out of business years ago!! ????
Somerset, Mass, Gaspars brand, in Fall River, Mass that’s where the factory is. It’s in all the stores like Safeway, Walmart, etc. I even saw an add on Pinterest where you can order it on a website! Wife is from
Just the way I learned to make them. Delicious.
Story is fantastic, love authentic foods, but the recipe would be nice.
I will get it from my parents and add it next time we make them.
Thank you Melinda, appreciate it.
hello their my parents have taken ill i would like to supprise them by making the
sausages for them but its one of those recipies thats in my moms head and she cant remember would you be able to send me the recipe please
Awesome! As the sausage-making season is coming closer, I’M looking for new recipes to try out. Thank you for sharing!
Hi Melinda, could you pls send me the recipe. So exciting to make chouriço. Looks great in your posting.
Thank you very much for share.
God bless
Hi Melinda,
Could you pls send me the Recipe. Looks yummy…
Thank you.
Ana, my parents are filling them today and will be posting that recipe within a few days once I get it from my mom. I told my mom to write every measurement down this time. As you know Portuguese women cook by eye not by measurement. LOL
These look amazing please post the recipe and thanks for the great article.
Mike
Thank you! I will be posting the recipe shortly.
Yes! Please post the recipe. Also a detail- – what type of wood do you use to smoke the sausages?
They use regular firewood. Nothing fancy 🙂
The recipe is posted! Let me know if you have any other questions.
I found your article on making Chorico sausage, fascinating and well written. I plan to make a small batch(8lb) this coming week, and do have a couple questions: I noticed that your recipe doesn’t include any nitrates (curing salts) for preserving the meat. Does the wine and regular salt take it’s place? and is the smoking process more for flavoring and dehydrating the sausage than cooking it? do they require refrigeration while they are drying indoors after the smoking? or are they like salami?
Joel, I honestly say I don’t now the technical answer to your questions. I know that this is how my parents and past generations have done it in the past. They only need to sit out for a day after the smoking process is done. Then we put a few in the fridge that we plan on eating within the week. The others we wrap in freezer paper, bag them and put in the freezer for the year. Hope this helps.
I can’t tell from your smoking instructions if you are cold smoking only or cooking slowly while smoking. Are these uncooked but edible sausage like pepperoni or if they afe fully cooked or if you still need to cook them as you don’t say what temperature you use during smoking other than warning not to let them get too hot and burn.
They are fully cooked. You can eat them once the smoking process is done. The heat temp during the smoking process is well over the cold smoking temp range. Hope this helps. Sorry I can’t be more help. I was lucky to even get a recipe since they always make things by memory.
Ola Melinda
muita obrigado pela sua receita do chorico a moda Portuguesa.
This is as far as I will go with my Portuguese as it is not sufficient enough to write an email with.
My name is Nelson Filipe I was born in EastTimor and have been living in Australia since 1975 because of the Indonesian invasion of my country.
A few days ago I was talking to brother inlaw about making our own chorico but the Portuguese way. Only the best will do right.
He being English myself being Portuguese born in East Timor raised in Australia, our biggest problem was, where do we start.
I have spent the whole day on the internet searching for recipes and eventually I came across your website and read about how you and your family make your very own Portuguese chorico and how simple you made it.
I would just like to say muita obrigado for sharing your family’s recipe and hopefully we can do it some justice all the way here in down under.
Obrigado
Nelson
Nelson, you made my day! I wish you and your brother-in-law the best of luck. Just remember, the temperature of the fire is very important. Keep a close eye! Please send me pictures.
can I buy the portguese sausage already made please reply
Robert, what area do you live in? Several Portuguese markets sell them throughout the United States. You may be able even order it online.
Obrigado for posting this recipe, I too am the torch bearer for our Portuguese Ohana/family in Hawai’i. Somive tried to learn from my Aintirs and Vovo and nana and mom to make sure our Azorean São Miguel traditions don’t die.
So reading your post brought back memories of the many Festas and matanza that have past and the Velhos that are gone. So irony in our family after 5 generations a man has to continue our food traditions, since my female cousins don’t cook much Portuguese now but as we’ve gotten older they ask me for my mom’s recipe for Pão Dôce/ massa Souvasda, Papos Secos and Bolos Levedos. As well as Linguiça and Morcella. Bifanas and Prego Na Pão and Vinha D’ Alhos. Still prevalent all these yrs. in Hawaii Portuguese community.
Less not forget the fejão and cal do Verde and Soupish. Oh and famous out here Malassadas!
Thanks. Do you folks make Linguiça and Morcella too? Would like to see your recipe. We made more Linguiça than all. I know their similar but not the same.
Aloha.
Kelena
Growing up my parents only made chourico. Calde Verde is my favorite soup! I will share my family recipe soon. I have few other Portuguese family recipes posted. Check them out and let me know what you think. https://www.homemadeinterest.com/portuguese-shrimp-turnovers/ & https://www.homemadeinterest.com/portuguese-rice-pudding-arroz-doce/ & https://www.homemadeinterest.com/portugese-style-baked-rockfish/
Subscribe to our newsletter so you will get all the new Portuguese I’ll be posting soon!
Hi going to Surrey BC and there is no place there to buy chourico. Everytime I go I pack a suitcase with a bunch for my niece. Would love to make your mom’s recipe but my niece dosnt have a smoker is it necessary to smoke them? Can I omit the smoking part?
My family has never tried not smoking them. Smoking it what gives them the great flavor they have. If you try it, please let me know how they are. I’m interested to see if that would work.
Liz, I spoke to a few Portuguese in my community and they said you can dry them out in the over at a low temp for two days if you don’t smoke them. Hope this helps.
Would it be possible to make the meat mixture and then cook this without the casing?
I love my chourico but am getting too feeble to do the casings I grew up in Fall River, Ma but now live in the suburbs of Chicago where there is no place to buy chourico. I usually have to order it. Thanks
Sure Dolores, we cook the meat once a day to check the seasoning. The same way we season this meat is how we season our bifanas and beef.
Love it. Good job!
Hello have a question for u can u estimate the temperature of ur smoker I have a electric smoker
Philip, I’m not sure the temp of the fire. I’m assuming it also depends on the distance from were the sausages to the heat. I think is you look up your smoker model, maybe they have recipes for it. Try and find one that is similar.
We’ve just had some black pig chourico made by a lovely little Portuguese woman named Gloria. She runs the local shop in the sleepy town of senhora da Rocha. We’ve been coming for a few years now and made friends with her and her husband which has paid off because we get to try all her home cooking. Another favourite of mine was her roast figs stuffed with almonds and seasoned in anise. Apparently they eat then at Christmas but I’d have them all-day everyday lol. God bless Portuguese cuisine. Obrigado ????.
The last time I was in Portugal was the first time I had heard of black pig. Every meal I had with black pig was amazing! Portuguese people love to feed others that’s for sure. I will have to look for the stuffed fig recipe, it sounds delicious. I have another Portuguese recipe posting next week that is super easy that you should check out. Muito obrigada 🙂
thank you so much for the information, I have always wanted to make Portuguese sausages. my parents make them.
I have made chourico using this recipe 4-5 times now. Mostly I love the results, although I struggle with keeping the sausage from crumbling apart after slicing it — the crumbly results are very similar to what is shown in the picture of sliced chourico and cheese on the cuttingboard.
I have a notion that draining the meat of all the liquid before stuffing the sausage will help with this problem. I will try that next time I make a batch.
Some changes I made that worked pretty well:
* I smoke my chourico in an offset BBQ smoker, shooting for ~150F and all the smoke I can get. This method gets the smoking done in ~6 hours rather than 48 hours, which makes finding time to make chourico much easier.
* I tried stuffing by hand for the first 2-3 batches. That’s for the birds. I bought a ~$75 compression sausage stuffer on eBay and got the stuffing done in under an hour. The crumbliness of the sausage actually improved when I used the stuffer.
* Rather than mess around with whole bay leaves (and removing them!) I just used ground bay leaves. That worked really well.
* The recipe does not call for a curing agent (e.g. #1 Cure, Instacure, Prague Powder, etc.) but I added some just in the name of food safety. I dissolved it a bit of wine and poured it into the mix. I used the same ratio of 1 tsp cure to 5 lbs of meat that is common for sausage-making.
* I fell in love with Chourico on the Caribbean island of Bonaire a few years ago (this is no joke — they have a HUGE european grocery store on the island that is incredibly well stocked with meats and cheeses), and what I loved about it was the spicy kick it offered. The recipe here is much milder, so I more or less doubled the amount of cayenne pepper it calls for.
I intend to keep playing with the recipe until I zero in on the perfect version (for me). I can post a detailed recipe when I am done, if anyone cares.
Dave those are great tips! I think the crumble you mention is the air that is trapped. My tips would be to really squeeze and using a needle to get the air out. All the shortcuts are great, especially for the younger Portuguese generations. I will share these tips with my parents. Thanks again!
Melinda
I plan on giving this a try. Can I use onion powder and crushed piri piri pepper? Also I’m confused with the portion size it says 20-50 sausages. How many sausages will 64lbs of meat make me approx?
Hey Richard, you can season however you’d like. Just make sure that it is a powder. Pepper flakes can rip the casing (that’s why you remove the garlic cloves and bay leaves). They amount of sausages all depends on how big your casings are. Our’s always seem to vary in size. This recipe makes 40-50, not 20-50. Please tell me how they turned out! I’d love it if you could send me a picture too. Boa Sorte!!
Dave, how are you hanging them in the smoker?
How many/much is 2 C garlic cloves? What does the C stand for?
C is for cups. We love garlic 🙂
Thank you so much for posting! It’s impossible to find Portuguese sausage in Colorado, and I have been dreaming of chouricio for the last 5 years (since I left California). Finally, a recipe that’s not all fancied up and is just like my neighbors made. Thank you so much! I cant wait to make breads and the caldo verde soup I’ve missed so much.
Wow, your not kidding saying it’s about imposable to get a recipe for Chourico. I grew up in New England, but have been in North Carolina for 25 years.
Of course in New England we could get all kinds of great brands of Chourico. I am going to try this recipe out, if you have any tips please share I will do the same once I’ve given it a run.
at the beginning of your text you say “DO NOT trim the fat off” – but at the instructions for print you say to trim the fat off. so what is it?
You do not want to trim ALL the fat, you trim most of it as instructed in the post.
Matança, not matanza
Thank you, I am fixing it now.
64lb is 24kg?is that correct?
What wine do you use,my dad still passing the tradition down to me,also did Leitao , do you have recepi for leitao?
It should be 29 kgs. I love leitao!
I almost feel like family after reading your recipe! I live in Connecticut and am graced with friends in Westerly who allow me to participate in their Sopressata making during our winters. I make a few sausage recipes but really small scale. It would be fun to try something like this but it’s really out of the question. Have you or anyone in your family scaled down the recipe? Most I could do would be 8 Lbs. Many thanks for making my day!
No we haven’t but the ratio should be equal if you divide it.