Halloween Rice Krispie Treats
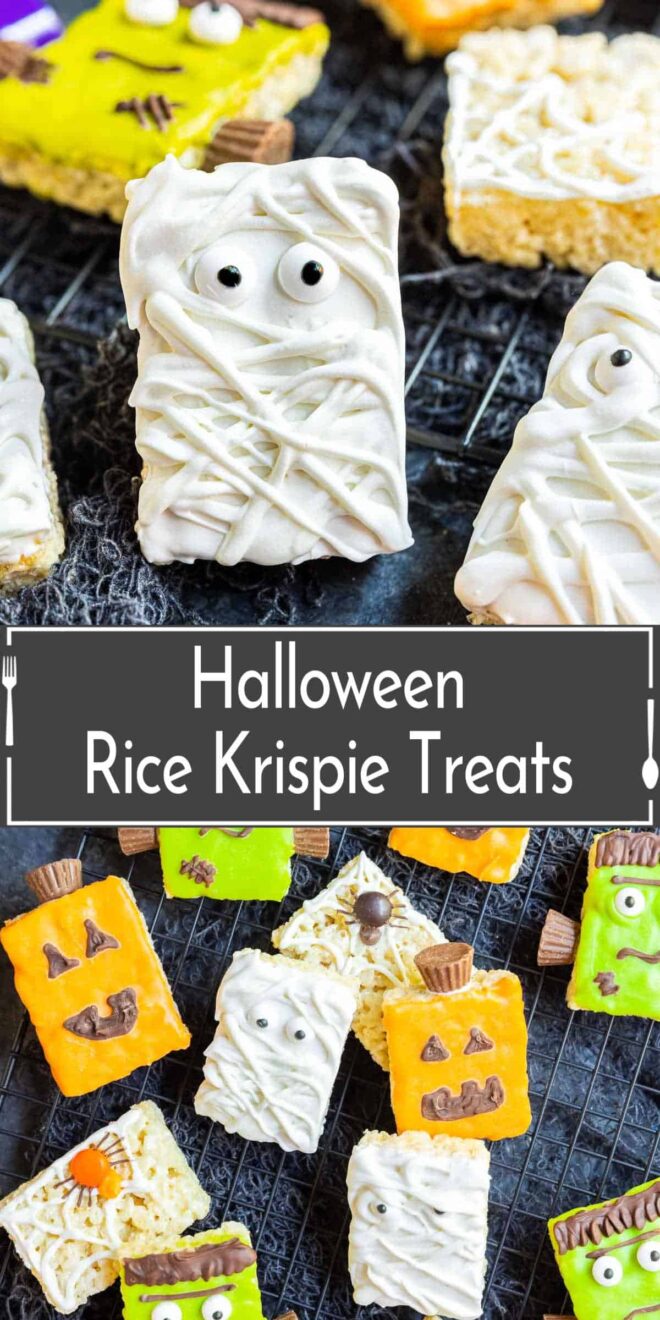


Halloween Rice Krispie Treats are an easy Halloween treat that can be decorated in 4 spooky ways! Here are simple instructions for making these delicious Halloween treats!
Halloween is just around the corner, and it’s time to whip up some spooky and delicious treats to delight your family and friends. One of the easiest and most fun Halloween treats to make is Rice Krispie Treats with a ghoulish twist.
Once your treats are ready for decorating check out the instructions below for 4 easy ways to decorate them for Halloween.
Don’t stop there make sure you try our mummy hot dogs, nutter butter boos, and Halloween dessert pizza too!
Note: This post may contain affiliate links. That means if you click on a link and make a purchase we may receive a small commission. Thank you!
Table of contents
Ingredients You’ll Need
These easy Halloween treats only need a few basic ingredients. And you probably already have several of them on hand. Here’s what to get:
- Butter – We typically use unsalted, but in a pinch, salted will work OK.
- Marshmallows – You can use either the small ones or the regular sized ones.
- Rice Krispies – We typically get the name brand stuff because it tastes better, but the store brand will work too. And for some change in flavor, you could use Cocoa Krispies or other varieties. Just keep in mind, if you want to color the treats, darker Krispies won’t work as well.
- Candy Melts – You can choose your preferred color for these because monsters really have no limits on creativity. For the designs below you’ll need white, orange, and green.
- Other candy – We used candy eyes, chocolate chips, M&M’s, and mini Reese’s cups to create the 4 designs below but you can use anything you like!
We’re using our basic rice krispies treats recipe but you could also use our Oreo rice krispies treat recipe if you want to have even more fun.
If you don’t have time to make homemade treats no worries, you can also decorate store-bought rice krispies treats and I promise you the kids will love them just as much!
How to Make Rice Krispie Treats
Step 1 – Melt the butter and prep the pan. In a large saucepan, melt the butter over medium-low heat. As it melts, use a non-stick spray to coat a 13×9 inch baking pan. If you don’t have cooking spray, you can rub it with a stick of butter so it has a bit of a coating.
Step 2 – Melt the marshmallows. When the butter has melted add the marshmallows and stir them until they have fully melted. This will take about 5 to 7 minutes.
Step 3 – Mix in the Rice Krispies. Stir in the Rice Krispies until the marshmallow mixture coats everything.
Step 4 – Fill the pan. Use cooking spray or butter to lightly coat your hands. This will prevent the sticky mixture from getting stuck to you. While the mixture is still warm, use your hands and spatula to spread and even out the Rice Krispie treats in the pan.
Step 5 – Cool, cut, decorate, and serve. Allow the treats to cool completely before cutting them and removing them from the pan. For fun decorating ideas, see the section below about giving them some Halloween flair!
How to Decorate Rice Krispies Treats for Halloween
Halloween is a time to get creative with sweets and treats. For the parents out there, decorating treats is a fun and easy way to spend some time with your kids. And, of course, you all get to eat your tasty creations.
If you need some inspiration, here are some simple steps for giving your rice krispies treats a Halloween makeover.
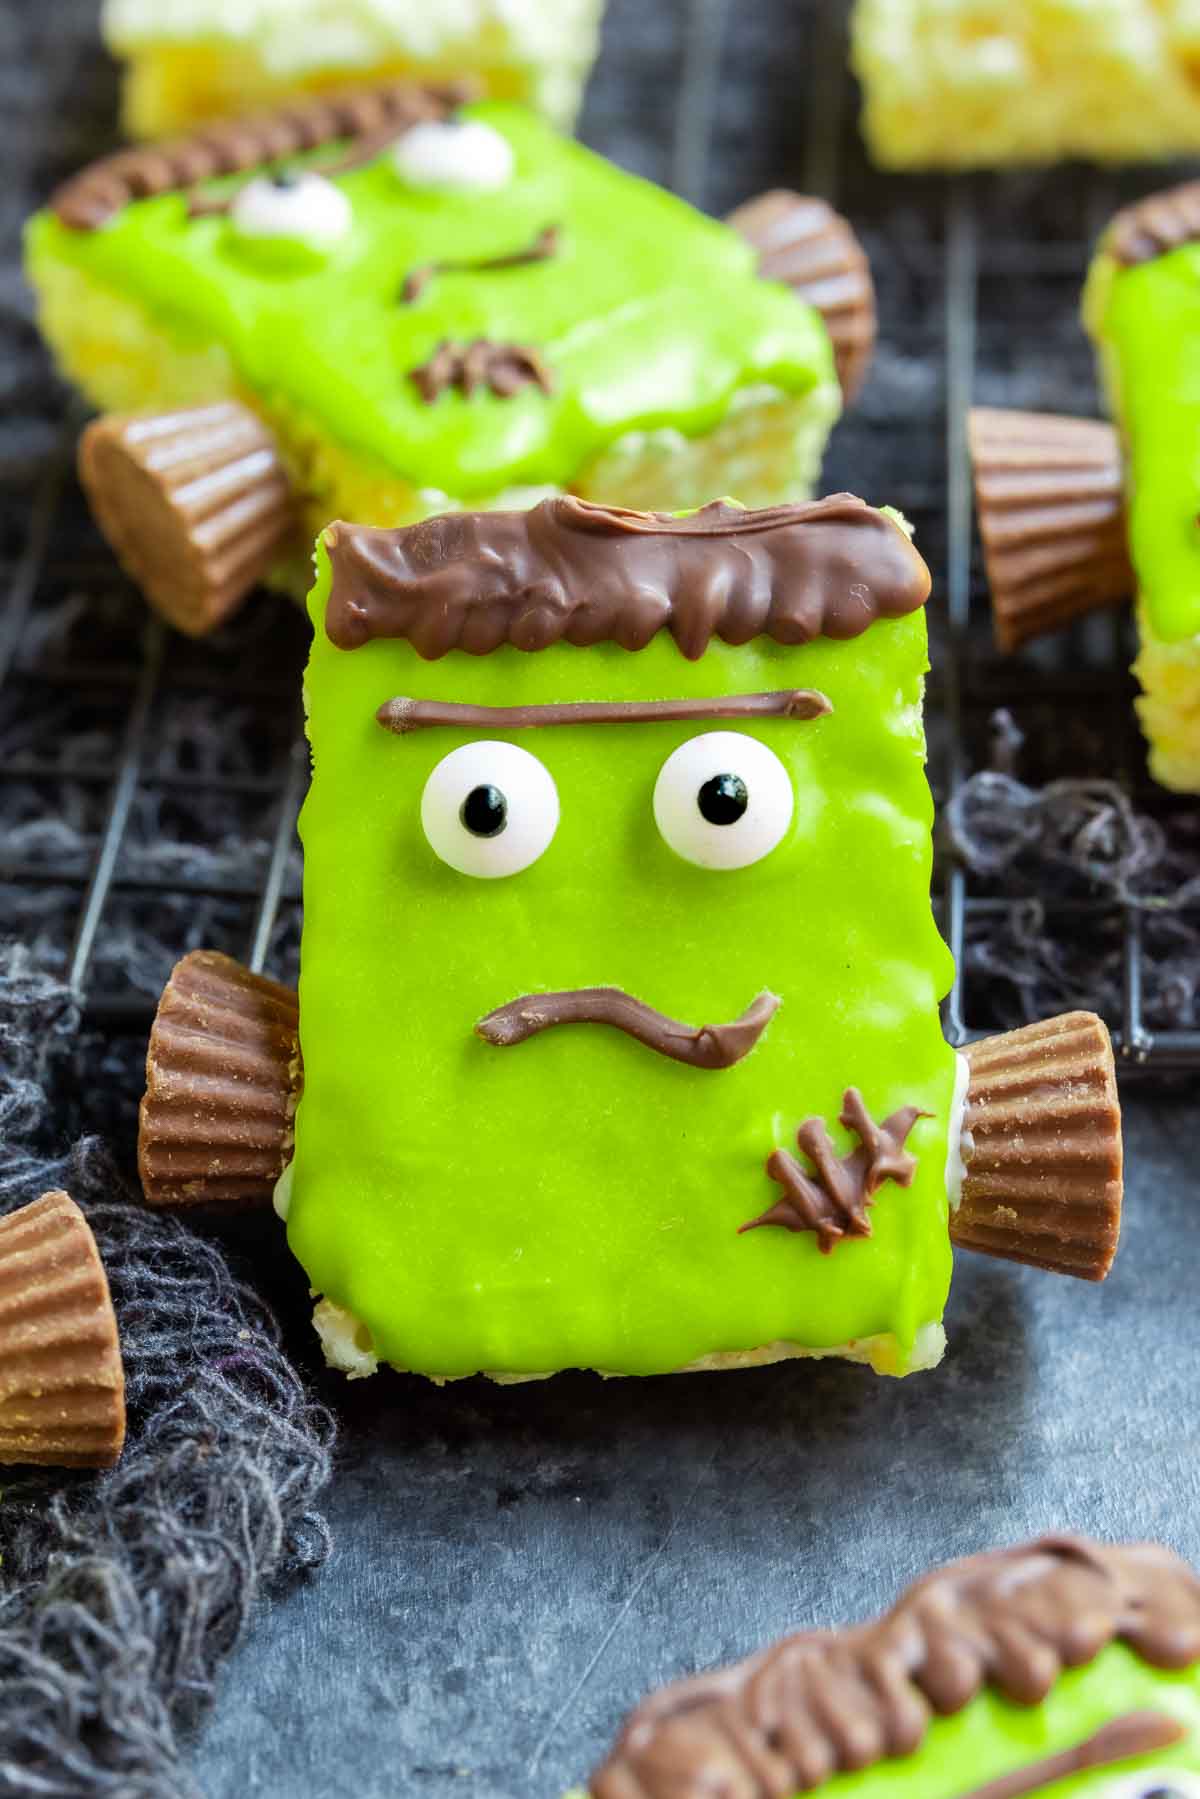
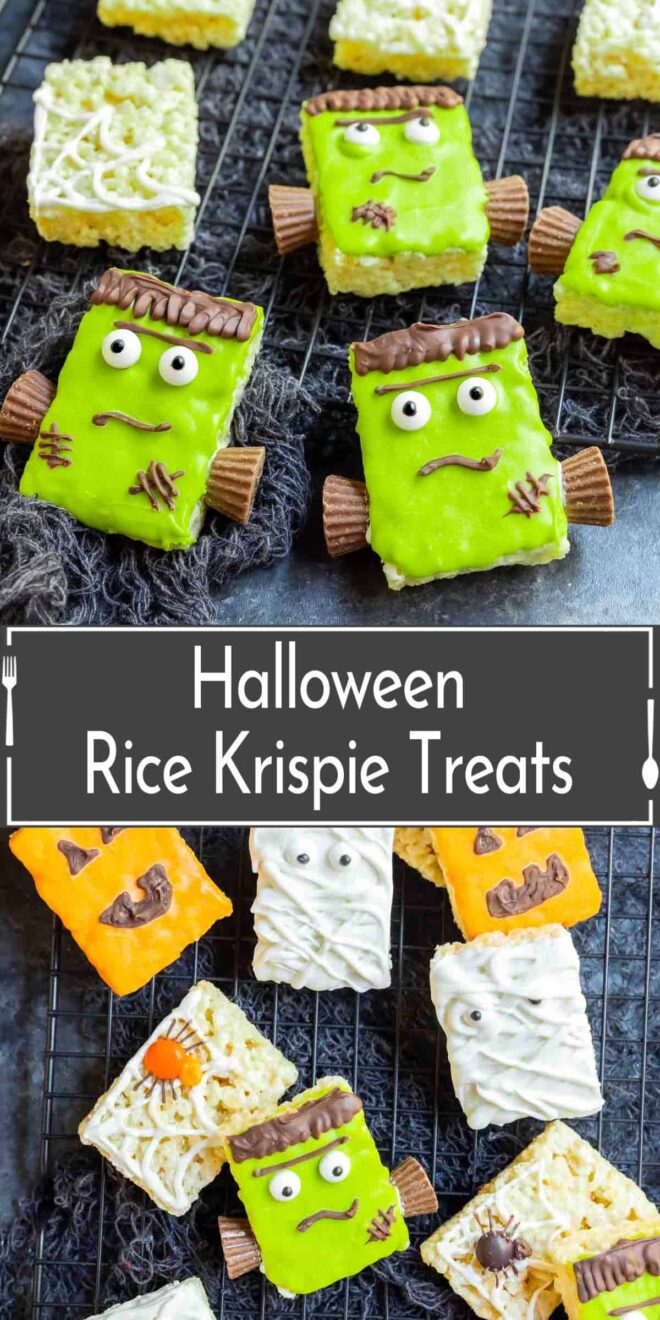
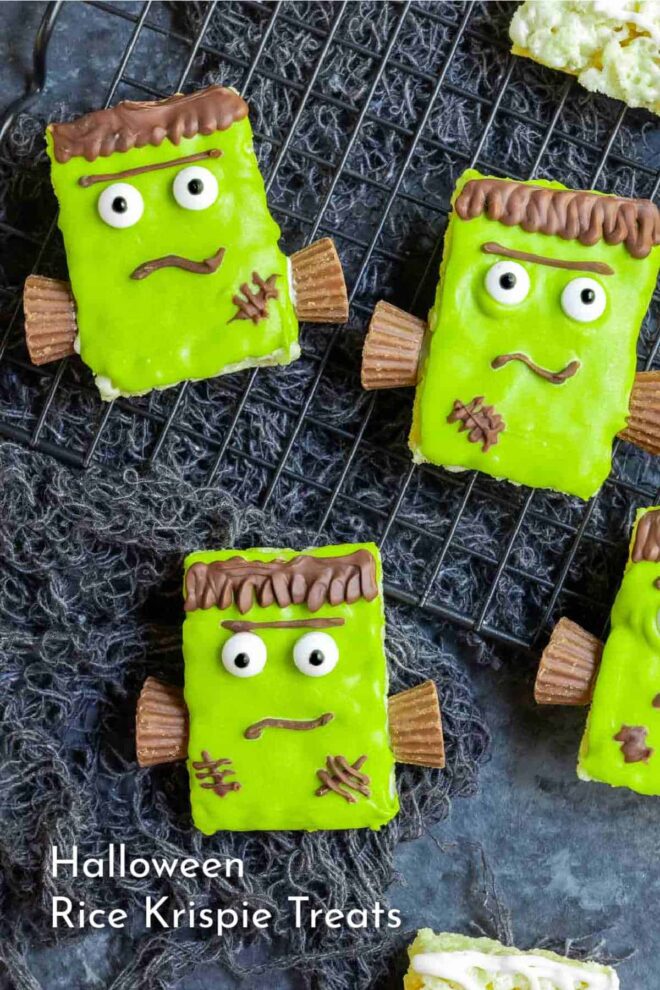
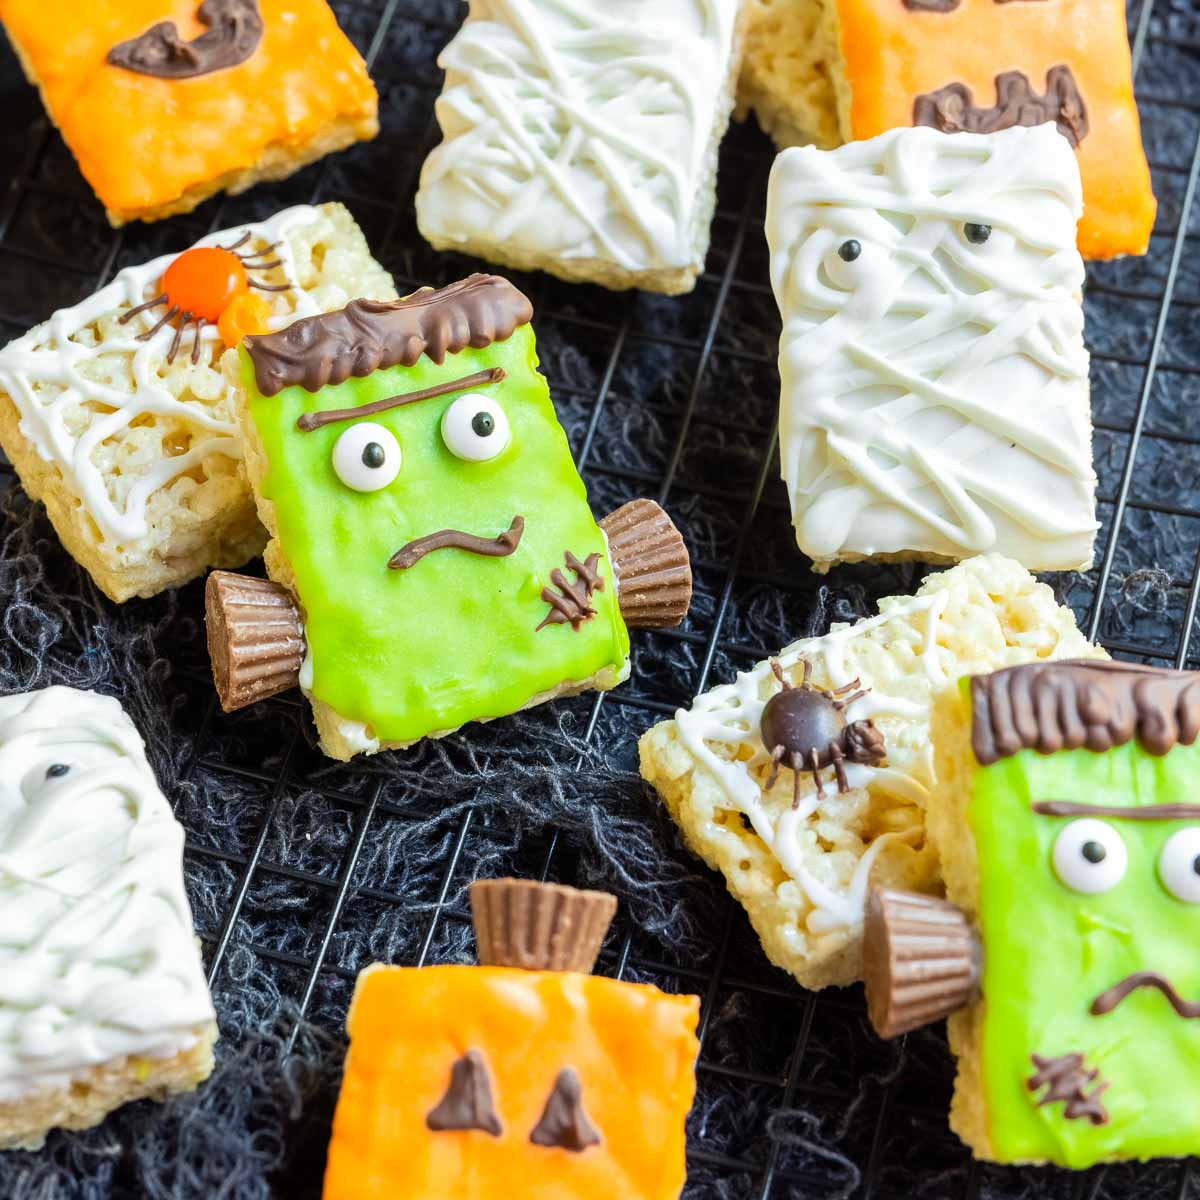
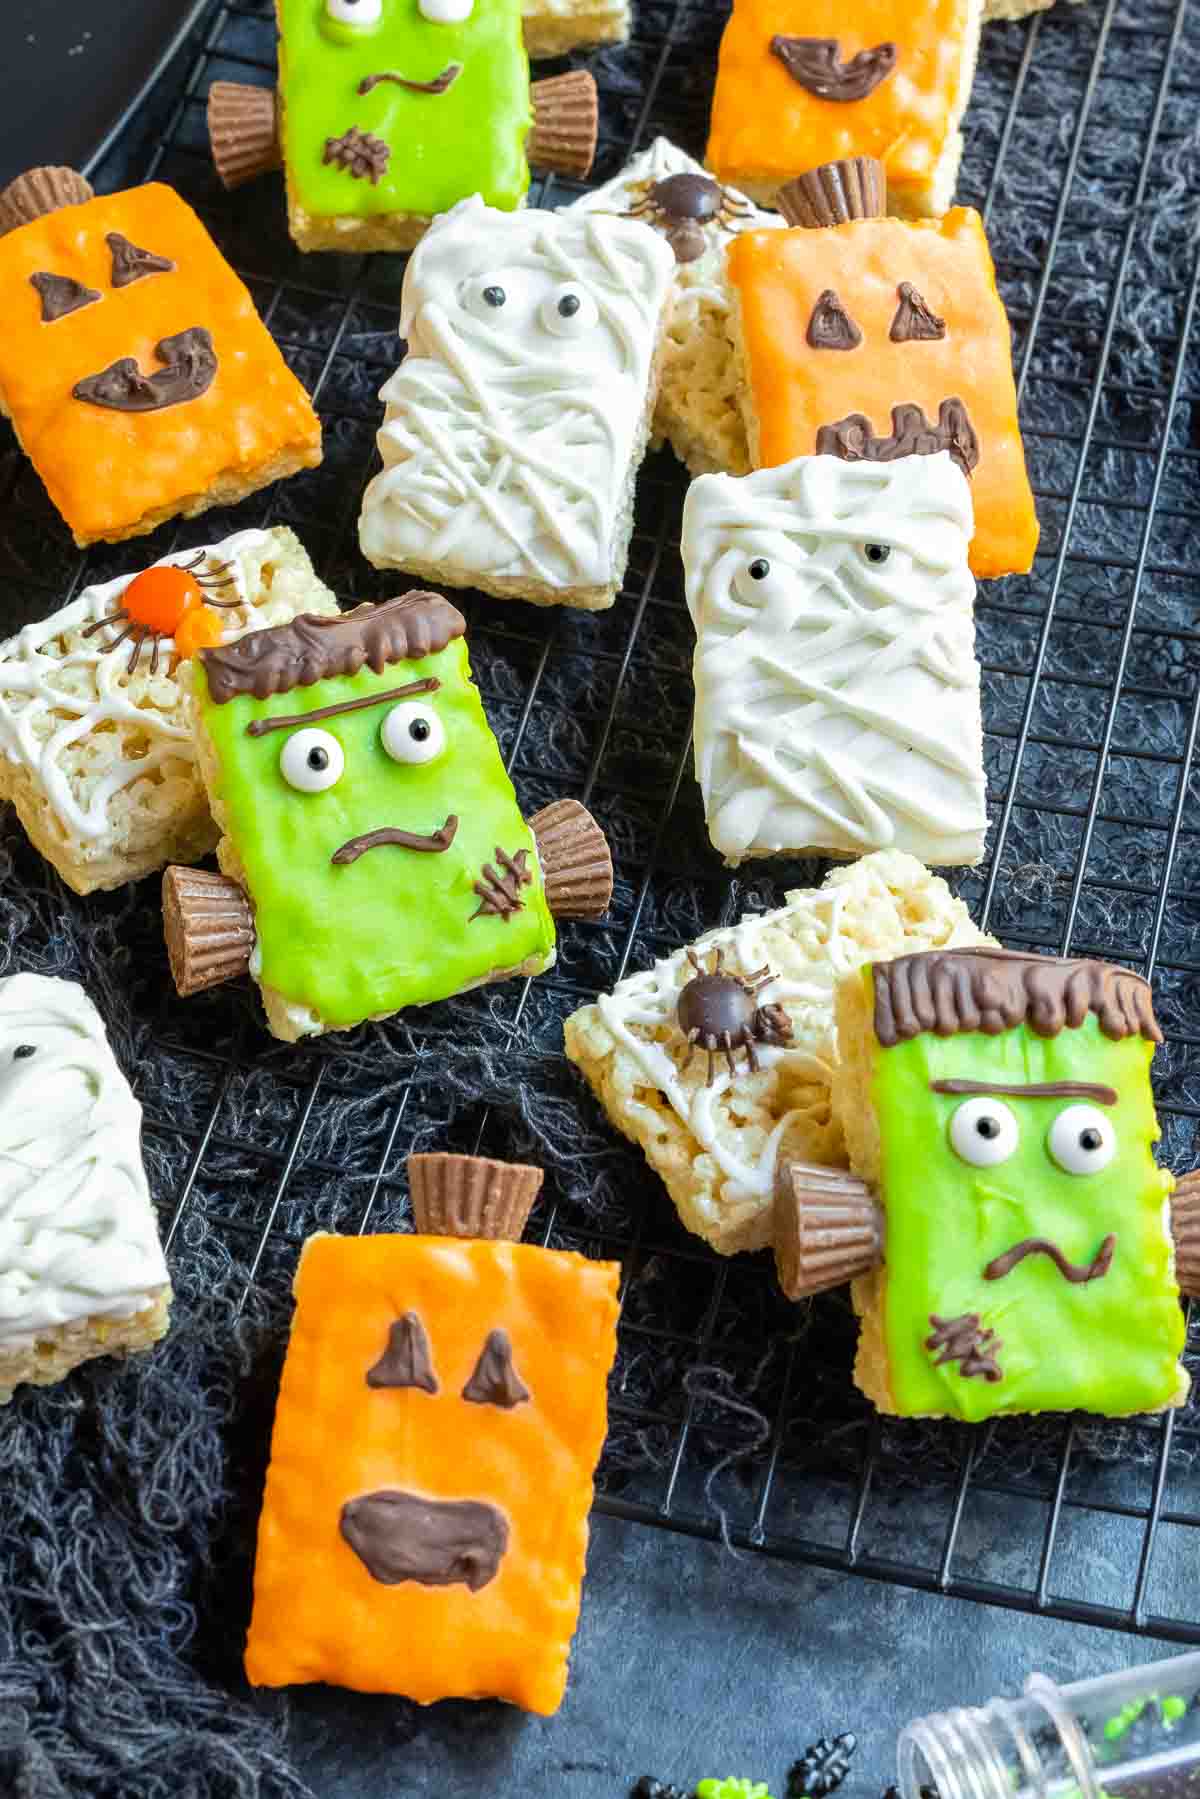
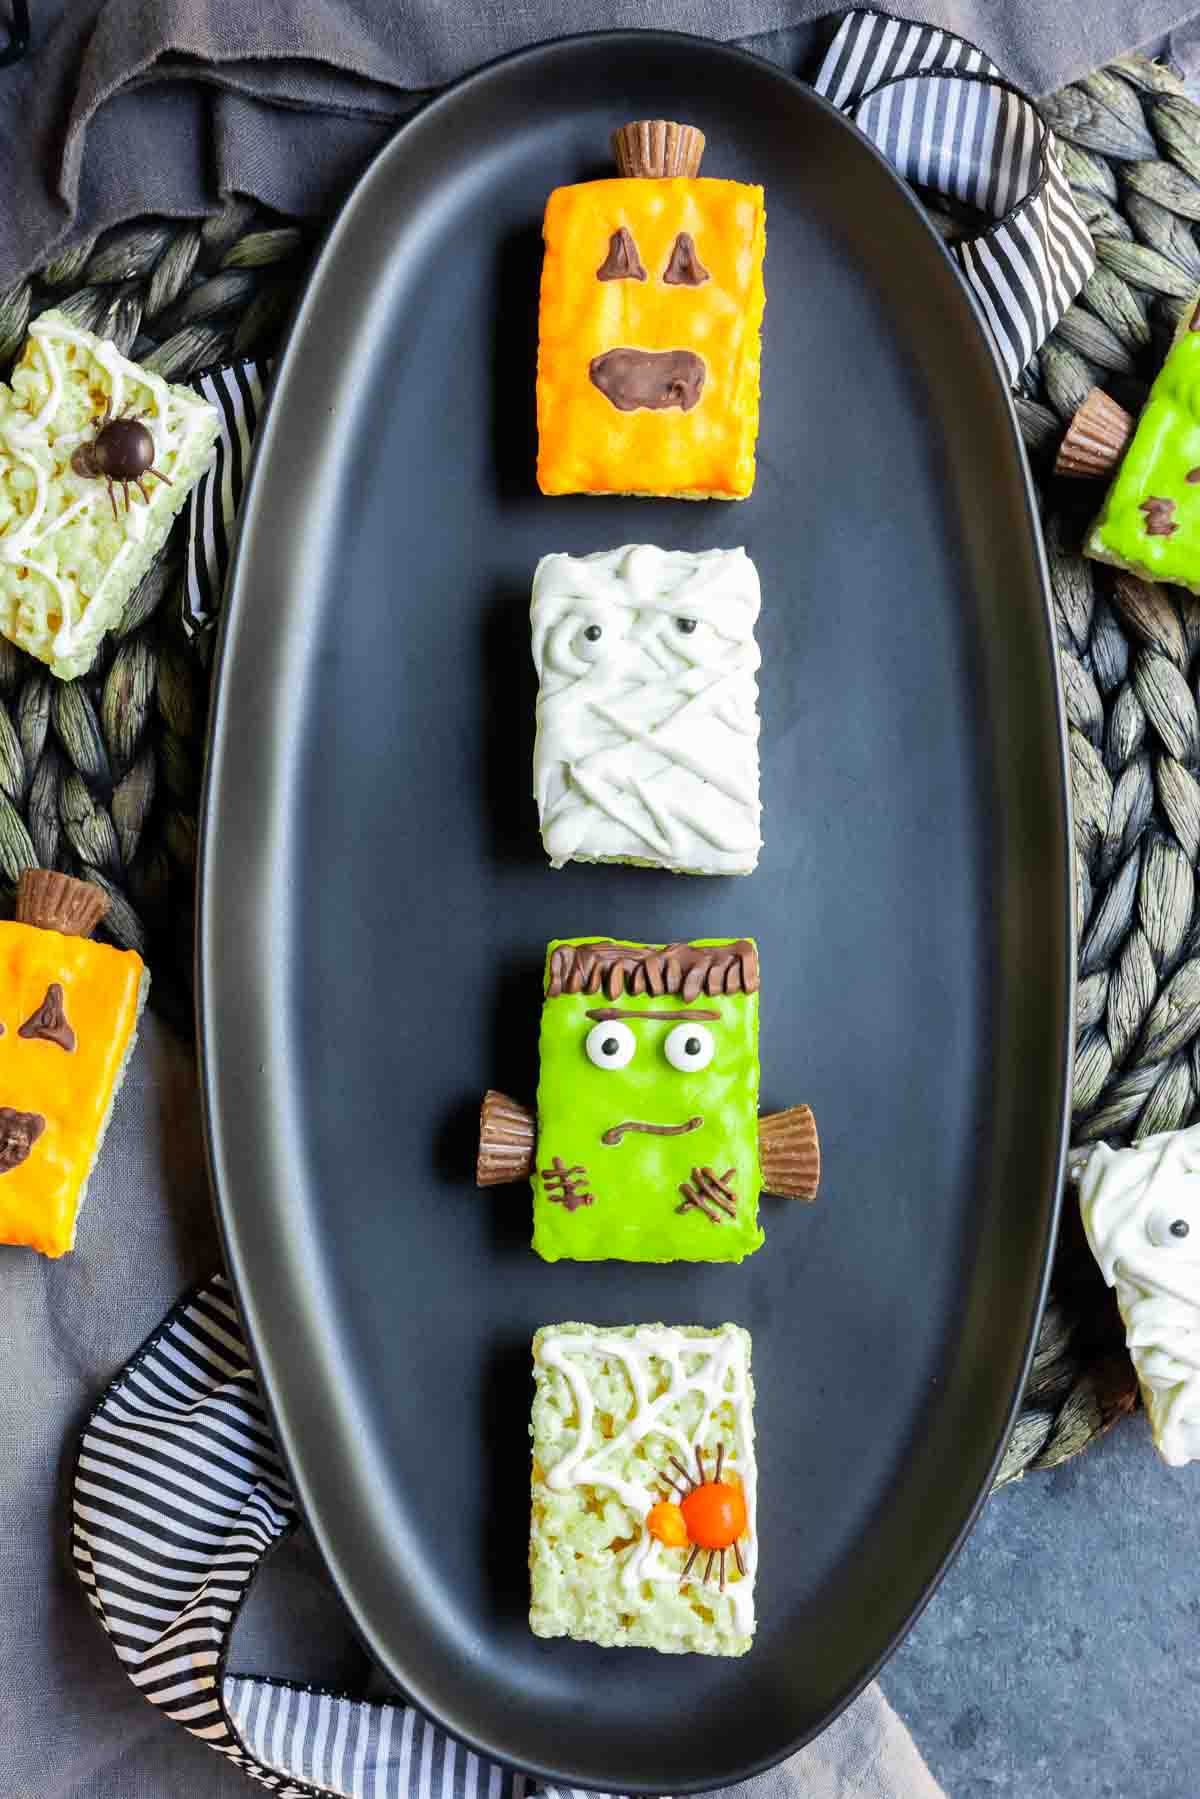
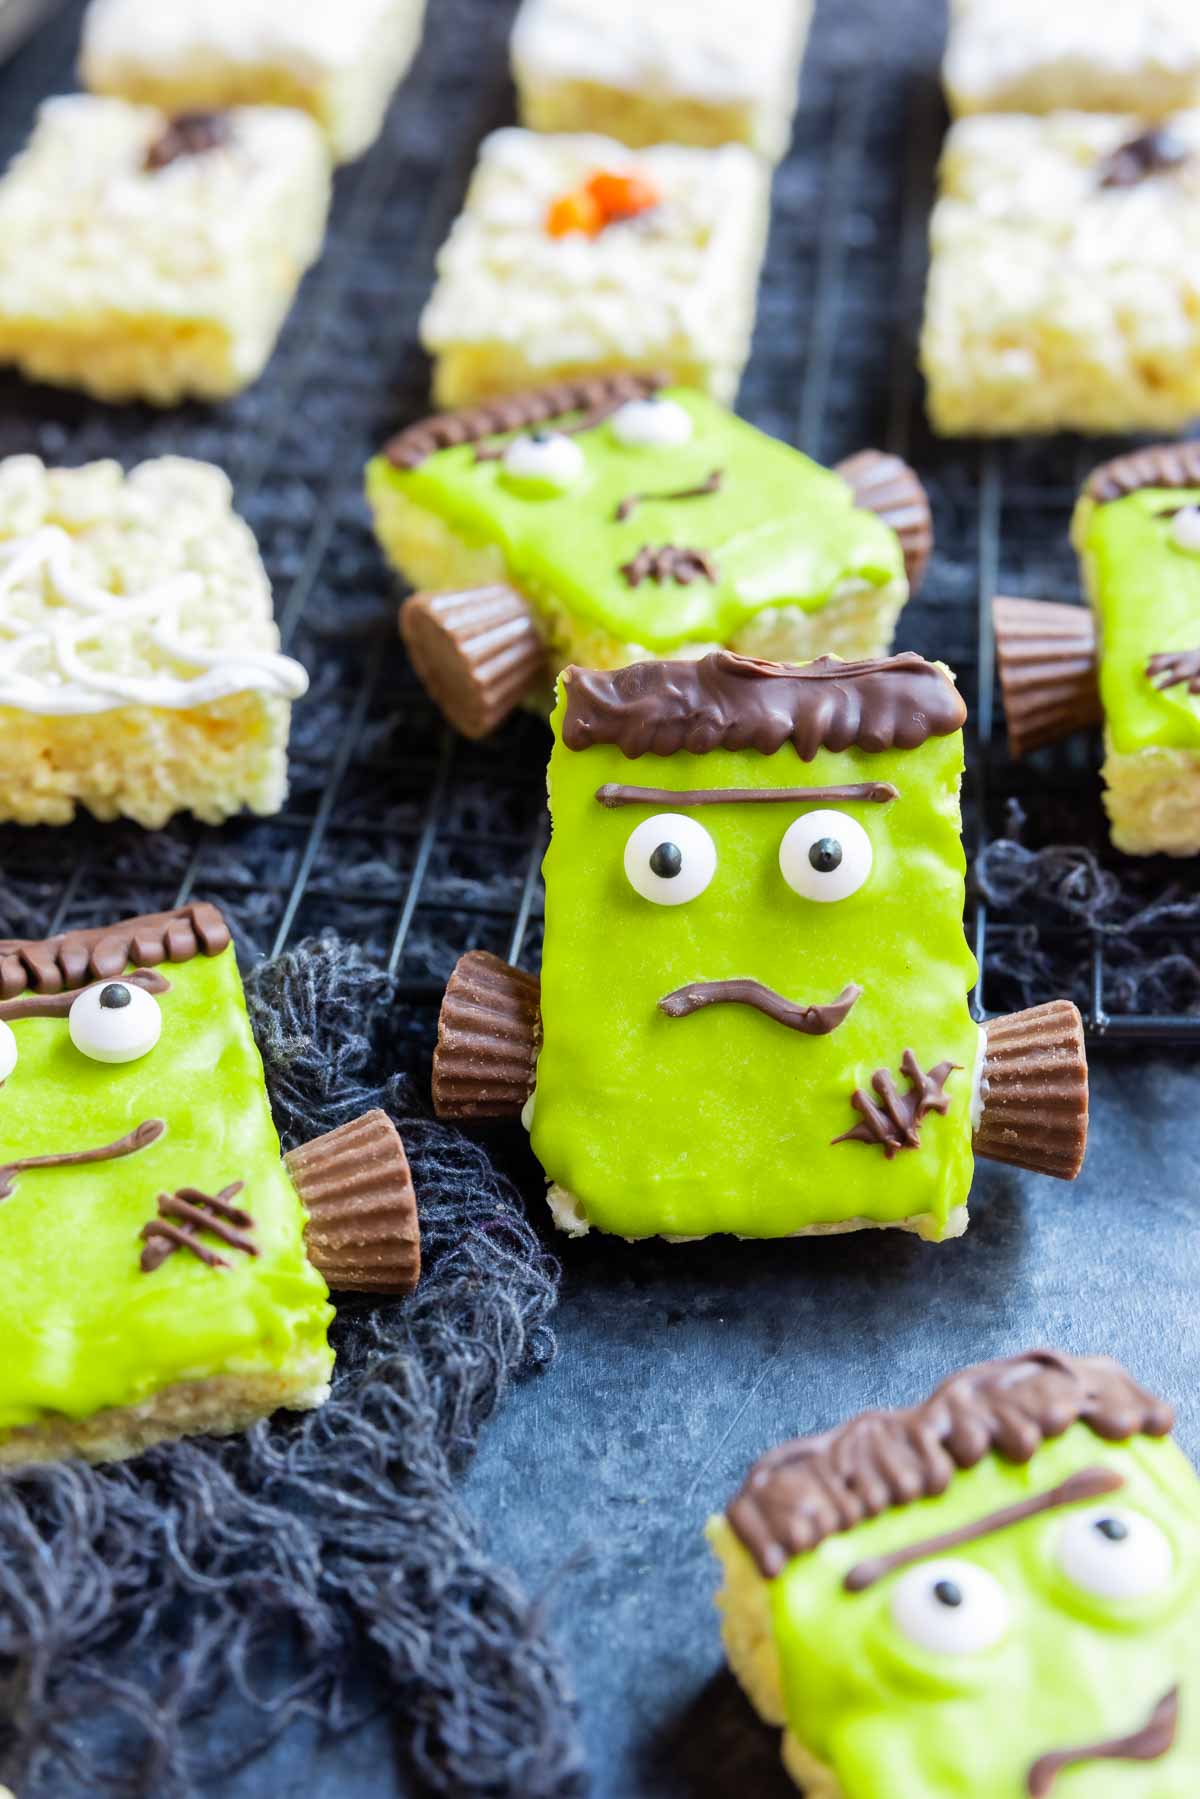
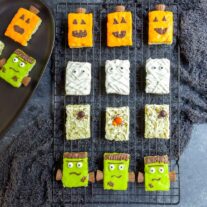
Frankenstein
One of the biggies, Frankenstein’s monster practically screams Halloween. Get your green melts ready, here’s what you need to do.
Step 1 – Melt green candy melts by placing them in a microwave safe dish with an opening large enough to be able to dip your rice krispies treat (we suggest a bowl) and microwaving for 30 seconds and then stirring. If it needs more time microwave for 15 seconds at a time, stirring in between, until fully melted and smooth.
Step 2 – Cut your rice krispies treats into rectangles. Take one piece and lightly press one side into the melted chocolate, just enough to coat it. After lifting out of the green melts turn it over and use a knife or the back of a spoon to smooth the melted chocolate over the surface.
Step 3 – Immediately press two candy eyes into the green surface. Place them about half an inch or so down from the top edge of the treat, leaving enough room for hair and eyebrows later. Set aside and let cool completely. Repeat steps 2 & 3 with the rest of your rice krispies treats.
Step 4 – Once the green layer has firmed up you can add the details. In a coffee mug melt about 1/2 cup of chocolate chips. Once melted and smooth spoon into a small sandwich baggie. Cut just the tip off of one corner and squeeze the chocolate down into that corner. This will now be your piping bag.
- Hair – Start by drawing hair along the top of the treat. Just a short squiggle up and down from one edge to the other.
- Eyebrows – In between the hair and the eyes draw a straight line across for the eyebrows.
- Mouth – Below the eyes, just slightly below the center line of the treat, draw a curvy line as the mouth.
- Stitches – Add one or two stitches by drawing a line and then 2-3 short lines that go the opposite way on top of the line.
- Bolt – Place a drop of chocolate on each side of the treat and then press a mini Reese’s cup to the chocolate. These will be the bolts in Frankenstein’s neck.
Let the chocolate cool completely until it is firm then serve.
More fun Frankenstein food ideas for Halloween:
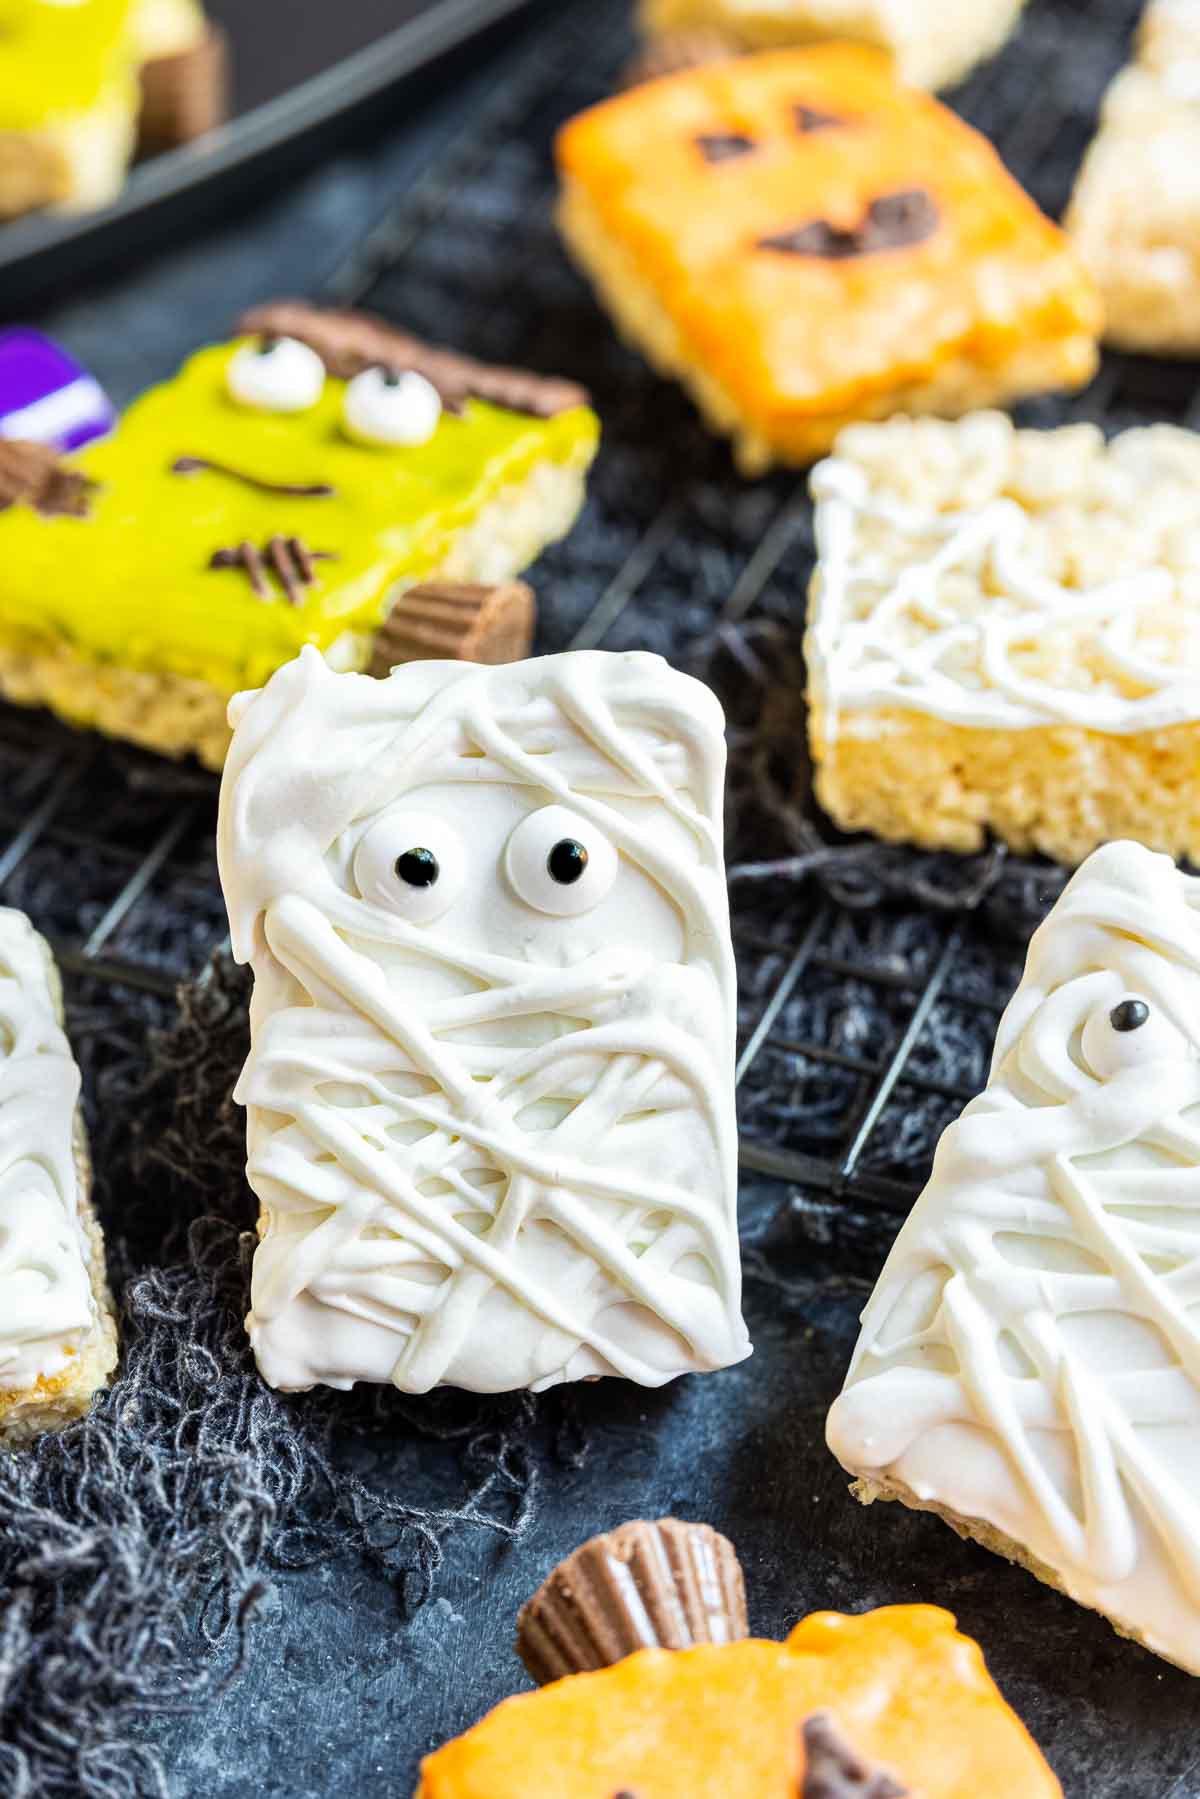
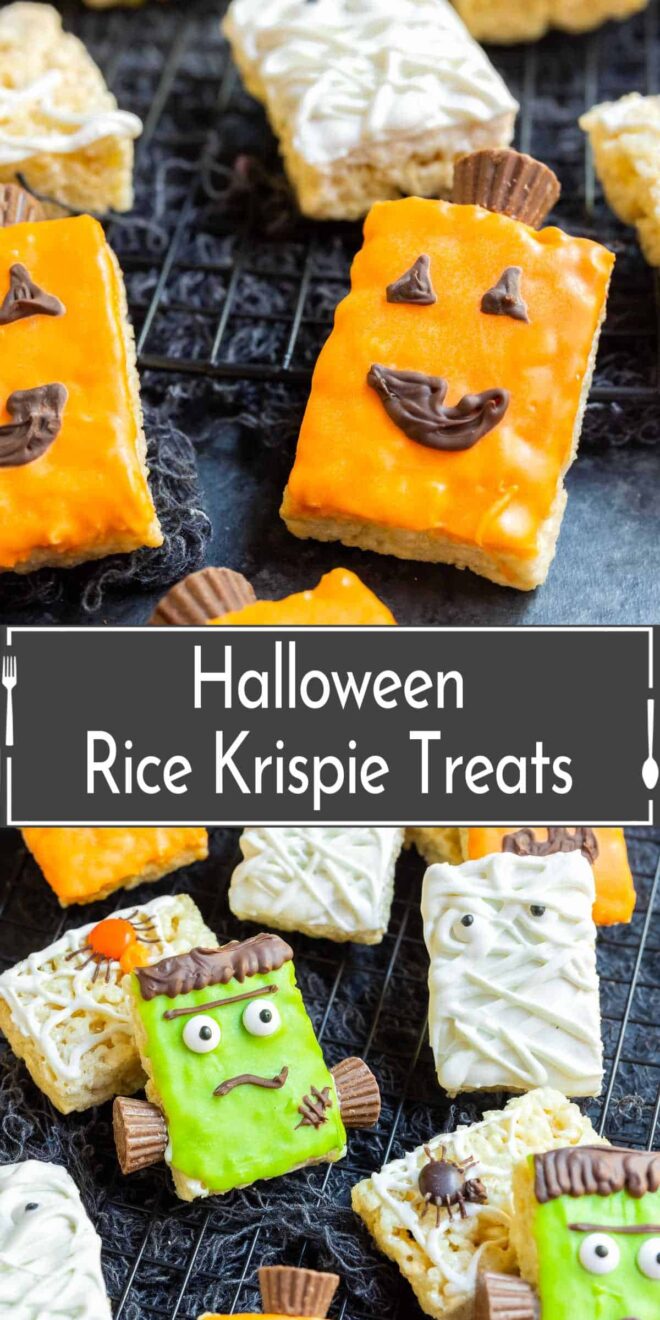
Mummy
Another popular monster, mummies have made their way into practically anything Halloween themed. Here’s how to make these bandage wrapped cuties.
Step 1 – Melt white candy melts by placing them in a microwave safe dish with an opening large enough to be able to dip your rice krispies treat (we suggest a bowl) and microwaving for 30 seconds and then stirring. If it needs more time microwave for 15 seconds at a time, stirring in between, until fully melted and smooth.
Step 2 – Cut your rice krispies treats into rectangles. Take one piece and lightly press one side into the melted white melts, just enough to coat it. After lifting it out turn it over and use a knife or the back of a spoon to smooth the melted chocolate over the surface.
Step 3 – Immediately press two candy eyes into the white surface. Place them about half an inch or so down from the top edge of the treat, leaving enough room for some details later. Set aside and let cool completely. Repeat steps 2 & 3 with the rest of your rice krispies treats.
Step 4 – Once the white layer has firmed up you can add the details. Reheat your white melts. Once melted and smooth spoon into a small sandwich baggie. Cut just the tip off of one corner and squeeze the chocolate down into that corner. This will now be your piping bag.
Begin drawing lines across the white surface (avoiding covering the eyes). Make a mix of diagonal and straight lines that cross cross over one another. These form your mummy wrappings.
Let the chocolate cool completely until it is firm then serve.
More fun mummy food ideas for Halloween:
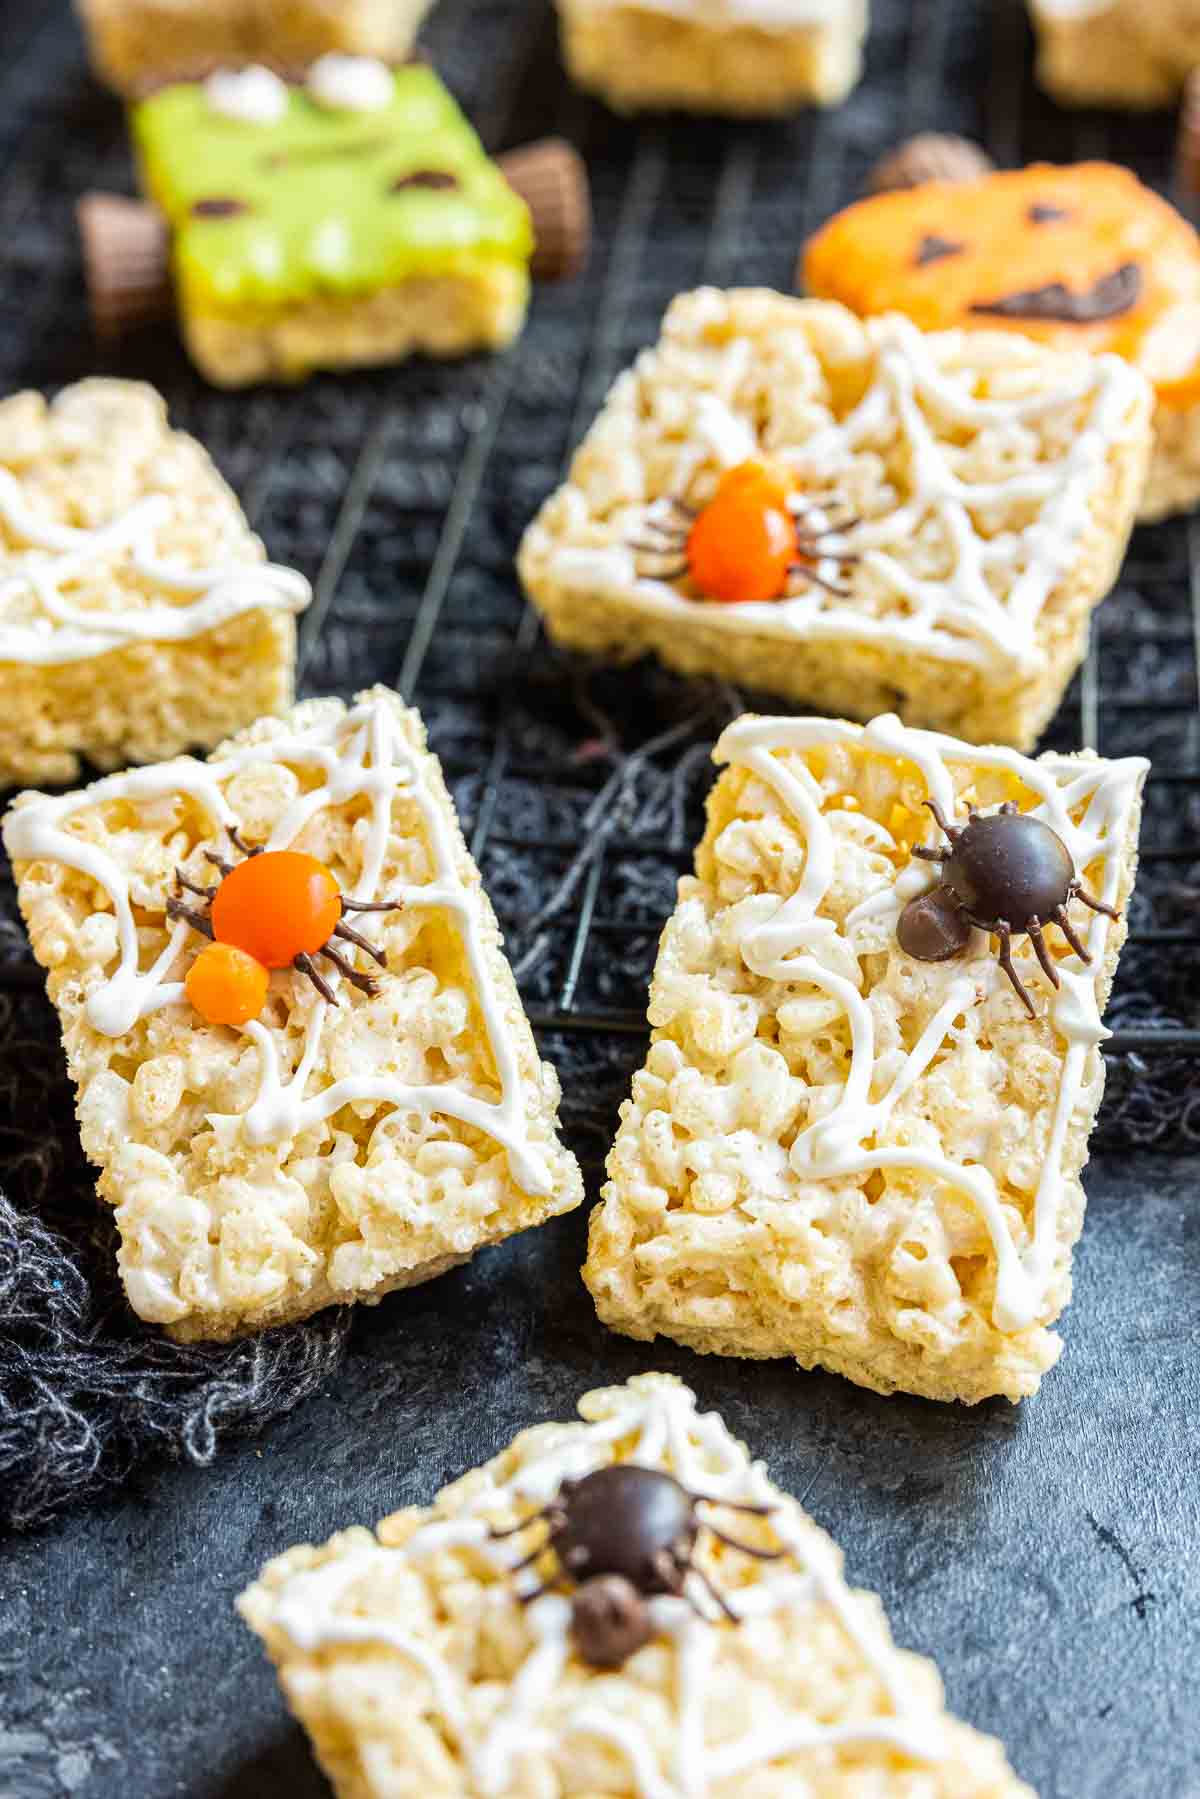
Spiders
We don’t know why spiders are quintessential to Halloween. Oh wait! Yes we do! They are terrifying! Follow these steps for a spider you can bite right into.
Step 1 – Melt white candy melts by placing them in a microwave safe dish (we suggest a coffee mug) and microwaving for 30 seconds and then stirring. If it needs more time microwave for 15 seconds at a time, stirring in between, until fully melted and smooth. Once melted and smooth spoon into a small sandwich baggie. Cut just the tip off of one corner and squeeze the chocolate down into that corner. This will now be your piping bag.
Step 2 – Cut your rice krispies treats into rectangles. In one corner draw your web by drawing a straight line along the short edge and then down the long edge. From the corner where the two lines meet draw two lines, equally spaced, that radiate out towards the middle of the treat. They should end so that they line up with the ends of the other two lines.
Fill in the web by drawing a curved line connecting the ends of each of the straight line. The line should be curving so that the curve faces the inner corner of the web. Repeat this step two more times so that in the end there are three segments to each triangle of the web.
Step 3 – Immediately place an M&M (whatever color you want your spider to be) on the web. This will be the body of your spider.
Step 4 – In a coffee mug melt chocolate melts that match the color of your spider. Once melted and smooth spoon into a small sandwich baggie. Cut just the tip off of one corner and squeeze the chocolate down into that corner. Place a dot at the end of each M&M for the head
Step 5 – To add the legs melt chocolate chips in a coffee mug. Once melted and smooth spoon into a small sandwich baggie. Cut just a tiny bit of the tip off of one corner and squeeze the chocolate down into that corner. This will give you a delicate little line for the legs. Draw four short lines on each side of the M&M.
Let the chocolate cool completely until it is firm then serve.

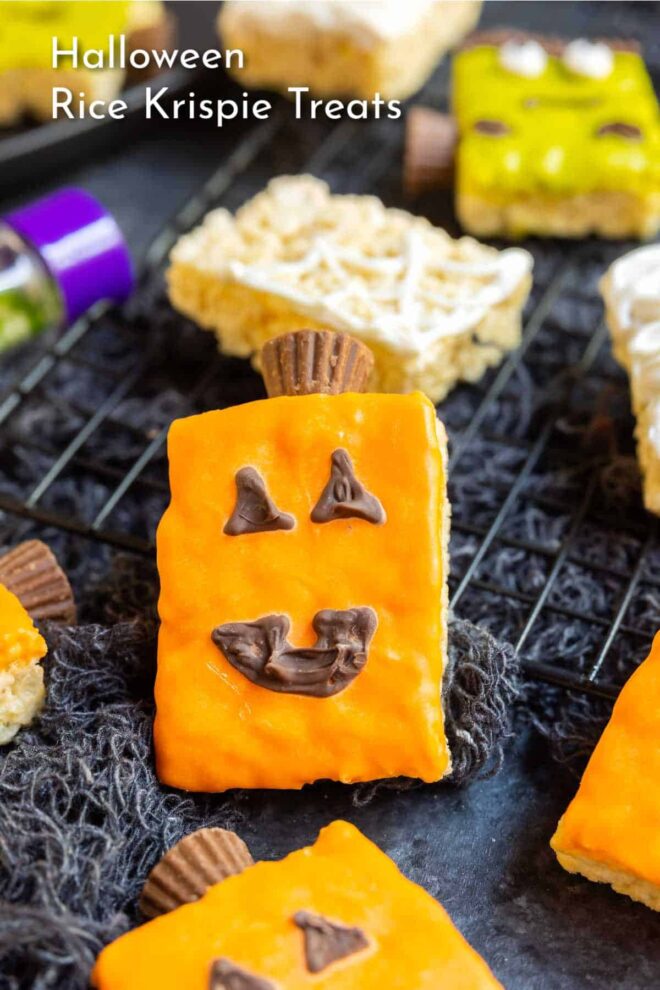
Pumpkins
Step 1 – Melt orange candy melts by placing them in a microwave safe dish with an opening large enough to be able to dip your rice krispies treat (we suggest a bowl) and microwaving for 30 seconds and then stirring. If it needs more time microwave for 15 seconds at a time, stirring in between, until fully melted and smooth.
Step 2 – Cut your rice krispies treats into rectangles. Take one piece and lightly press one side into the melted orange melts, just enough to coat it. After lifting it out turn it over and use a knife or the back of a spoon to smooth the melted chocolate over the surface. Set aside and let cool completely. Repeat steps with the rest of your rice krispies treats.
Step 3 – Once the orange layer has firmed up you can add the details. In a coffee mug melt about 1/2 cup of chocolate chips. Once melted and smooth spoon into a small sandwich baggie. Cut just the tip off of one corner and squeeze the chocolate down into that corner. This will now be your piping bag.
Step 4 – Draw a jack-o-lantern face on the orange surface of each treat. Start with two triangles for eyes and then draw a simple mouth. You can make it any shape you want. Just have fun with it and don’t worry about perfection!
For the stem place a drop of melted chocolate on top of the treat and press a mini Reese’s cup onto it.
Let the chocolate cool completely until it is firm then serve.
Other Fun Ideas
Halloween sprinkles
Simple, elegant, and fun, this version of the rice cereal treats gives them a Halloween theme with minimal work involved. And with all the different kinds of sprinkles you can find in the fall, there is practically no shortage of different decorations you can use. Coat your treat in melted chocolate and top with your favorite Halloween sprinkles for a super easy Halloween treat!
Coloring Rice Krispies Treats
If you don’t want to deal with lots of melted chocolate one of the easiest ways to decorate your rice cereal treats is with a few drops of food coloring. How much can vary based on the richness of the color you are going for, but we recommend starting around 5 drops for most colors.
Lighter colors may need more while darker colors might be good with less. Some good Halloween colors include:
- green
- orange
- black
- purple
We use food coloring gel. You should also have no issue with traditional food coloring either.
To use the coloring, melt your butter and marshmallows. Before adding the cereal, add the drops of food coloring and mix until the marshmallow mixture is a consistent color and the darkness you desire.
If it is still light, add a drop or two more and stir. Keep adding a small amount at a time until you get the color you want.
This will cover the base color for your treats and then you can just use a small amount of melted chocolate for the details.
How to Store Them
Storing your Halloween Rice Krispie Treats is essential to keep them fresh and delicious. Here’s how you can store them:
- Airtight Container: Place your Rice Krispie Treats in an airtight container. This will help prevent them from becoming stale and keep them chewy.
- Layer Separation: If you need to stack the treats in the container, consider placing sheets of wax paper or parchment paper between the layers. This prevents them from sticking together.
- Cool, Dry Place: Store the airtight container in a cool, dry place. Avoid areas with high humidity, as moisture can make the treats lose their crispness.
- Room Temperature: Rice Krispie Treats are best stored at room temperature. Avoid refrigerating them, as the moisture in the fridge can affect their texture.
- Cover the Container: Ensure that the container’s lid is tightly sealed to maintain freshness.
- Consume Promptly: While Rice Krispie Treats can stay fresh for up to a week when stored properly, they are best enjoyed within the first few days for the optimal taste and texture.
By following these storage tips, you can enjoy your homemade Halloween Rice Krispie Treats for an extended period without sacrificing their deliciousness.
Looking for More Halloween Treats?
- Halloween Magic Cookie Bars
- Werewolf Chow {Halloween Puppy Chow}
- Keto Halloween Deviled Eggs
- Halloween S’mores Dip
- Halloween Slime Pops
- Caramel Apple Dip
- Turn your Leftover Candy into Witch’s Brew Brownies
- Easy Pumpkin Pie Dip
- No Bake Monster Cookies
- Candy Bar Cookie Bars
- More Halloween Recipes…
Like this recipe?
Make sure to follow us on Instagram and Pinterest for more recipes like this.
Rice Krispies Treats
Ingredients
- ½ cup Butter
- 20 ounces Marshmallows
- 7 cups Rice krispies
- Colored Candy Melts
- Edible decorations
Instructions
- Heat a large saucepan over medium low heat. Add butter and let it melt.
- Grease a 13×9 inch pan with non-stick spray. Set aside.
- Once the butter has melted add the marshmallows and stir them until they have fully melted. Approximately 5-7 minutes.
- When the marshmallows have fully melted add the gel food coloring of your choice. I usually use about 5 drops depending on the color I am going for.
- Add the Rice Krispies to the marshmallow mixture and stir together until the marshmallow coats everything.
- Lightly coat your hands in a little bit of butter or non-stick spray and then, while the mixture is warm, pour it into the greased pan and use a spatula and your hands to press it down into the pan making a solid layer of rice krispie treats.
- Let cool completely and then cut, serve, and decorate with your favorite Halloween decoration. See several Halloween Rice Krispies Treats decoration ideas in the post above.
Notes
Nutrition

This dish is just made for Halloween and I loved it! Even with my rather mediocre cooking skills, it wasn’t even too bad, not that I even liked it!
Can you use royal icing instead of the melted chocolates?
Thank you
Steph
Yes! If you prefer royal icing you can use it in the same way. You can also use regular frosting but that makes stacking impossible so I prefer chocolate or royal icing so everything stays neater.
So cute and creative! I love these Halloween Rice Krispy treats.